
How to Use Pitchbox: A Step-by-Step Guide
Welcome to Pitchbox! 🎉
This guide takes you from setup to your first sent campaign. You'll connect your email account and build your automated outreach email sequence. Then you'll inspect and personalize your prospects, launch your outreach, manage replies and connect third-party integrations.
Navigation
- Connecting Your Email Account
- Creating Your Campaign
- Creating Your Outreach Templates
- Inspecting Your Prospects
- Personalizing Each Opportunity
- Launching Email Outreach
- Replying and Inbox Management
- Adding Integrations
📧 Connecting Your Email Account
Before you can send your first cold outreach email, you'll need to connect your email account to Pitchbox. It only takes a minute:
- Open your Email Account Settings.
- Click + Add Email Account next to your email provider (Gmail, Outlook, etc.).
- Follow the prompts to give Pitchbox permission to send emails from your account.
📣 Creating Your Campaign
With your email account connected, you're ready to create your first campaign.
Choose a campaign type
Start by choosing the campaign type that matches your outreach goal. Each type finds a different kind of opportunity:
- Blogger Outreach
- Hot Off The Press
- Blog Category Search
- Advanced Operator Search
- Roundups
- Resource Pages
- Product Reviews / SaaS Product Reviews
- Import Campaign (CSV), for importing your own list of URLs
Add your keywords
Next, add keywords relevant to your niche or topic. Pitchbox uses them to search for opportunities, so the more relevant your keywords, the better your results. Our campaign keyword strategy guide explains how to pick keywords for each campaign type.
Set up while you prospect
Once you've launched the campaign, Pitchbox starts prospecting for opportunities. Prospecting takes some time, so use it to set up your email templates and sequence. Your results will be ready to review once you're done.
✍️ Creating Your Outreach Templates
Each campaign has an automated email sequence. On the Pro plan, you can add up to three email templates to your sequence. Higher plans unlock up to ten templates with Dynamic Delay, which lets you control the timing between each follow-up. The more personalized your templates are, the better your chances of getting a response.
Choose your sending addresses
- Return to your project using the Project dropdown at the top to open your Campaign Dashboard.
- Open the Campaign Settings of your campaign and select Templates & Email Sequence.
- Choose the email address or addresses you want to send outreach from. You can send from a single address or use email rotation for added flexibility.
Add your templates
Every opportunity in a campaign receives the same set of templates. On the Pro plan, you can add up to three templates to your sequence. Higher plans can add up to ten using Dynamic Delay.
- Attempt #1: your initial pitch
- Attempt #2 onwards: your follow-up emails
- Final attempt: the last email in the automated sequence
We recommend using at least three templates, as campaigns with three emails tend to see higher response rates.
A thoughtful, personalized email stands out in a crowded inbox. Use imagery, links and emojis where appropriate, and always include a professional email signature.
Need inspiration? Choose from the Template Library, or copy in existing templates from your other campaigns using the same dropdown.
Use Custom Fields
Custom Fields let you tailor every email to the prospect, showing that you've done your research and value their work. That makes your email more likely to be read and answered. You can also use them to track key data about your opportunities across your Pitchbox account.
- System fields: when you create a campaign, Pitchbox automatically adds and fills in Site Name
{{FLD_SITE_NAME}}and Target Page Title{{FLD_PAGE_TITLE}}for every opportunity using AI. Import campaigns also get URL List{{FLD_URL_LIST}}, which is filled directly from the URLs you import. You'll find all three in the Opportunity Enrichment group. - Your own fields: create as many Custom Fields as you like, such as URL Found On to reference the exact page you're reaching out about.
- AI-powered fields: build your own AI fields, such as a personalized opening line or a relevance score.
To use a field, add its token to your template's subject line or body. When the email is composed, Pitchbox replaces each token with that opportunity's value. For example, "I just read {{FLD_PAGE_TITLE}} on {{FLD_SITE_NAME}}" becomes "I just read The Beginner's Guide to Link Building on Moz".
To create your own Custom Field, go to Settings > Custom Fields. Fields are organized into groups, so add a group first. Then click + New Custom Field, name your field and choose a field type. To use the field in your outreach, set its display options to show in Email Templates. To fill it in while you personalize opportunities, also show it on the Personalization Detail Screen.
Only admins and users with the Manage Custom Fields privilege can create and manage Custom Fields. A field's type can't be changed once it's created. To change it, you'll need to delete the field and re-create it, which also deletes any values entered for it.
💡 Pro tip: learn more about Custom Fields
- Does Pitchbox Automatically Add Any Custom Fields to a Campaign?
- Custom Fields: The Complete Guide
- Linking Custom Fields to a URL
- Custom Field Reports
🔍 Inspecting Your Prospects
Next, filter through the opportunities Pitchbox has prospected for your campaign. Each campaign has its own objective, so your criteria for approving sites may differ from one campaign to the next.
-
Head to the Personalize stage of your workflow and open Inspect & Personalize.
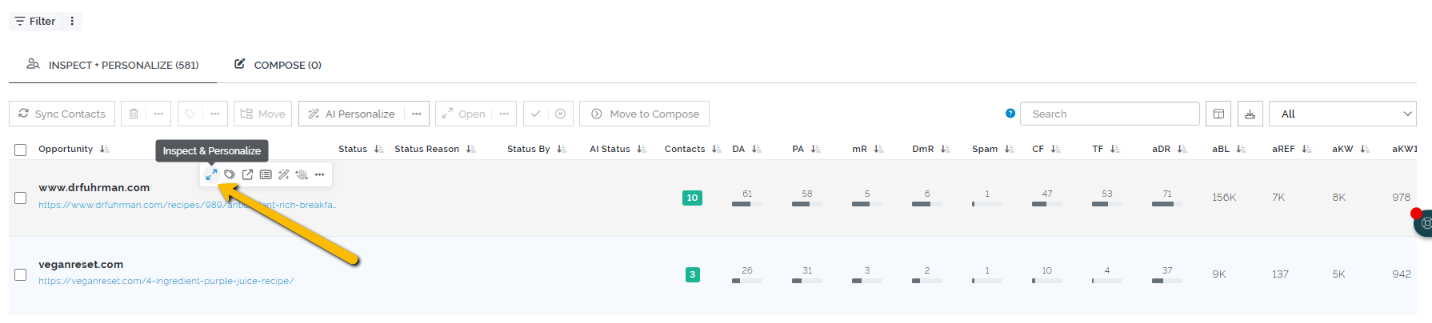
- Use the Personalization & Site Viewer pop-up to browse each website and check it's the right fit.

- Mark each opportunity as Passed or Failed to prepare it for the personalization stage.

The Inspector role
Users with the Inspector role have restricted access to the pop-up. They can browse websites, mark opportunities as Passed or Failed and add a reason for rejecting a site.
Adding keywords to an existing campaign
If you're looking for more or different results, you can run a new search with a fresh list of keywords within the same campaign.
🎯 Personalizing Each Opportunity
The same Personalization & Site Viewer pop-up is used to fill in the data for each opportunity.
Contacts
Pitchbox pulls in contacts directly from each website as it prospects. You can enhance a contact to pull in extra information such as job title, location and social media pages.

Rearrange contacts in order of relevance and priority. We recommend keeping it to five or six contacts where possible, so your outreach isn't used up on low-priority targets.
Custom Fields
Fill in the data for the Custom Fields used in your templates.
- System fields: Pitchbox fills in Site Name and Target Page Title automatically using AI, and URL List from your import. AI fields are accurate most of the time, but give them a quick check, especially Site Name. Sites with unusual branding, abbreviations or several publications under one domain can occasionally produce a name that isn't quite right.
- Your own fields: any AI-powered fields you've created generate their content for you. All other Custom Fields need to be filled in manually.
Every value can be edited before the email goes out. If a field is left empty, its token will be blank in the email, so check for missing values before you move on.
Once the opportunity is complete, submit it to Compose.
🚀 Launching Email Outreach
Compose is where you preview and launch your outreach. There are two ways to send.

Preview & Send
Use Preview & Send to check that your personalization is filled in correctly. Custom Fields are highlighted in blue, and you can edit the template for each individual opportunity at this stage.
Turn on the Automatic Follow-Up Sequence toggle if you want your follow-ups to send automatically. If it's off, you'll need to launch the second and third attempts manually from Compose.

Launch Automation Sequence
If you're confident your emails are personalized correctly, launch your outreach in bulk without previewing. This turns on the automatic follow-up sequence by default.
Outbox and Sent
Your emails line up in the Outbox and send according to your Outreach Schedule. Pitchbox mimics human sending by delivering emails one to three minutes apart. Once sent, emails appear in your campaign's Sent box.
📥 Replying and Inbox Management
Pitchbox makes it easy to manage replies and follow-ups:
- Go to the Inbox in the left-hand menu to view responses from your prospects.
- Reply directly from within Pitchbox and track every conversation in one place.
Using AI Reply
Use the AI Reply feature to help with your back-and-forth negotiations.
Keeping CRM milestones up to date
Always keep your CRM milestones up to date as you reply, so your Pipeline reflects where each conversation stands.
🔗 Adding Integrations
Pitchbox integrates with a range of third-party tools to strengthen your outreach:
- Zapier for automating workflows
- Ahrefs, Semrush and Majestic for better targeting and backlink analysis
- OpenAI and Anthropic for using AI to make your outreach more efficient
How to set up an integration
- Go to Account Settings.
- Under Integrations, select the tool you want to connect.
- Follow the on-screen prompts to authorize the integration.
💬 Need more help? Contact our support team at pitchbox@support.com or reach out via live chat for more info.