
Custom Fields: The Complete Guide
Custom Fields let you capture, standardize and report on key data about your opportunities across every Pitchbox campaign, either entered by your team or generated automatically by AI. This article covers where to find Custom Fields, the field types available, how to add, scope, group, merge and control the visibility of fields, and how to keep your data clean for reporting.
Navigation
- What Are Custom Fields?
- Scope: All Campaigns vs. Specific Campaigns
- Field Types: AI-Powered vs. Static
- Static Field Types
- Adding a Custom Field
- Organizing Fields With Groups
- Reordering Groups and Fields
- Merging Custom Fields
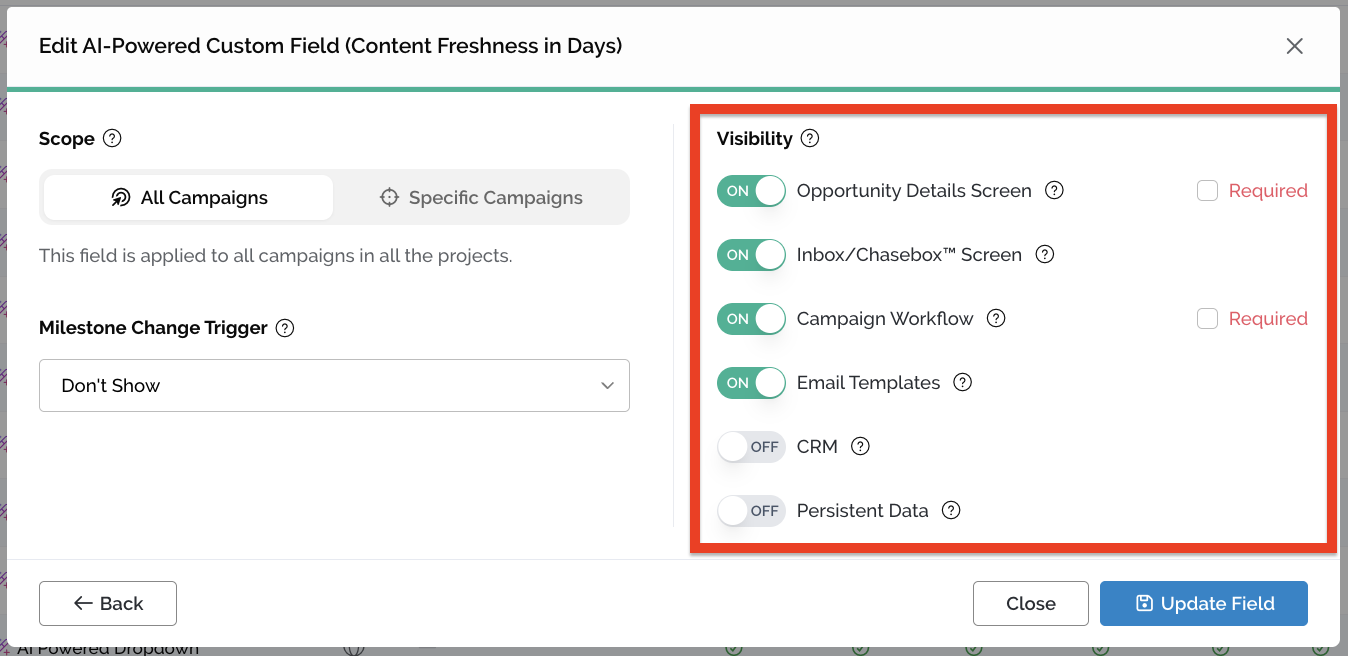
- Visibility Settings
- Required Fields and Data Standardization
- Editing, Removing and Deleting Fields
- Who Can Manage Custom Fields
- Migrating From Personalization Fields
- Tracking Custom Field Data
🧩 What Are Custom Fields?
Custom Fields allow you to enter and track key data related to your opportunities across your Pitchbox account. Common ways teams use custom fields are:
- Qualifying sites during prospecting, such as domain quality, content type and placement type.
- Building a custom scoring or ranking system for opportunities.
- Recording asset costs (images, content, etc.) and specific dates.
- Capturing why a deal was won or lost, for your partner database.
- Generating an AI-scored value, like a content relevance score, automatically.
- Generating AI-personalized information to add to your email templates.
Custom Fields can appear during personalization (the Workflow), within email templates, on the Opportunity Details page, and in the Inbox/Chasebox and CRM. You control which, using visibility settings.
📍 Scope: All Campaigns vs. Specific Campaigns
Every custom field has a campaign scope that controls where it appears:
| Scope | What it means |
|---|---|
| Specific Campaigns | The field applies only to the campaigns you select. This is the default when you create a field from inside a campaign; that campaign is selected for you automatically. |
| All Campaigns | The field applies account-wide, to every campaign you have now and any you create later. |
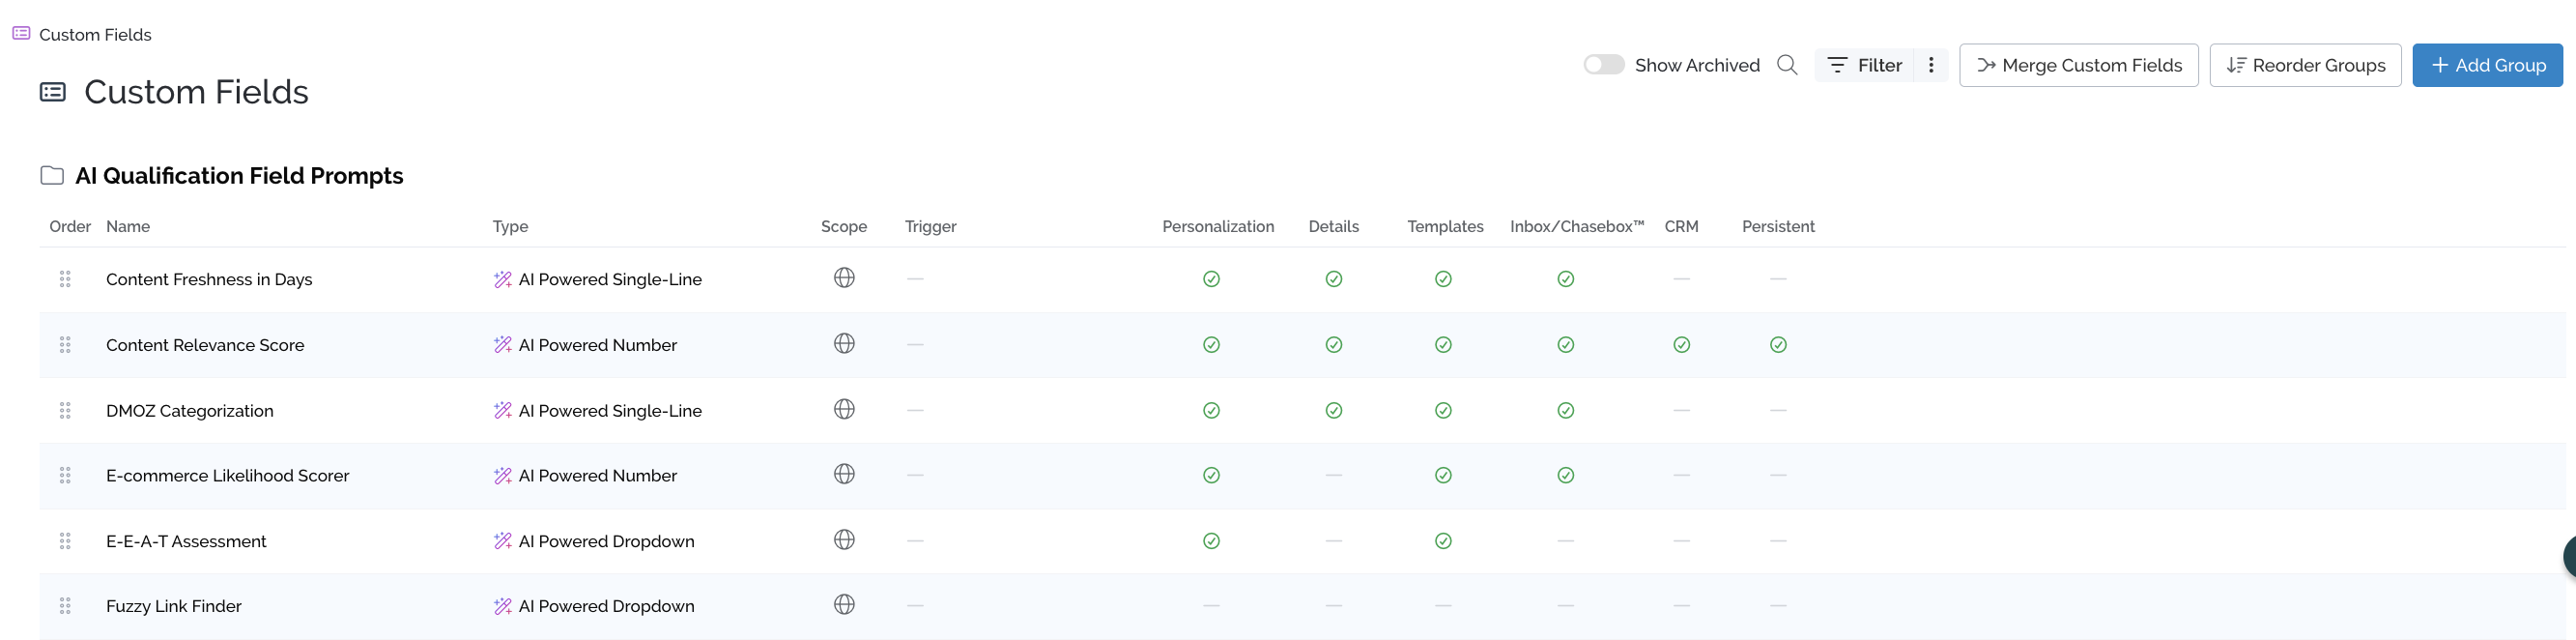
Fields with either scope can be managed in two places:
- Settings → Custom Fields – your full field library, where you can view, edit and delete any field.
- Campaign settings → Custom Fields – where Personalization Fields used to be. From here you can add a field that already exists in your library, or create a new one on the spot.
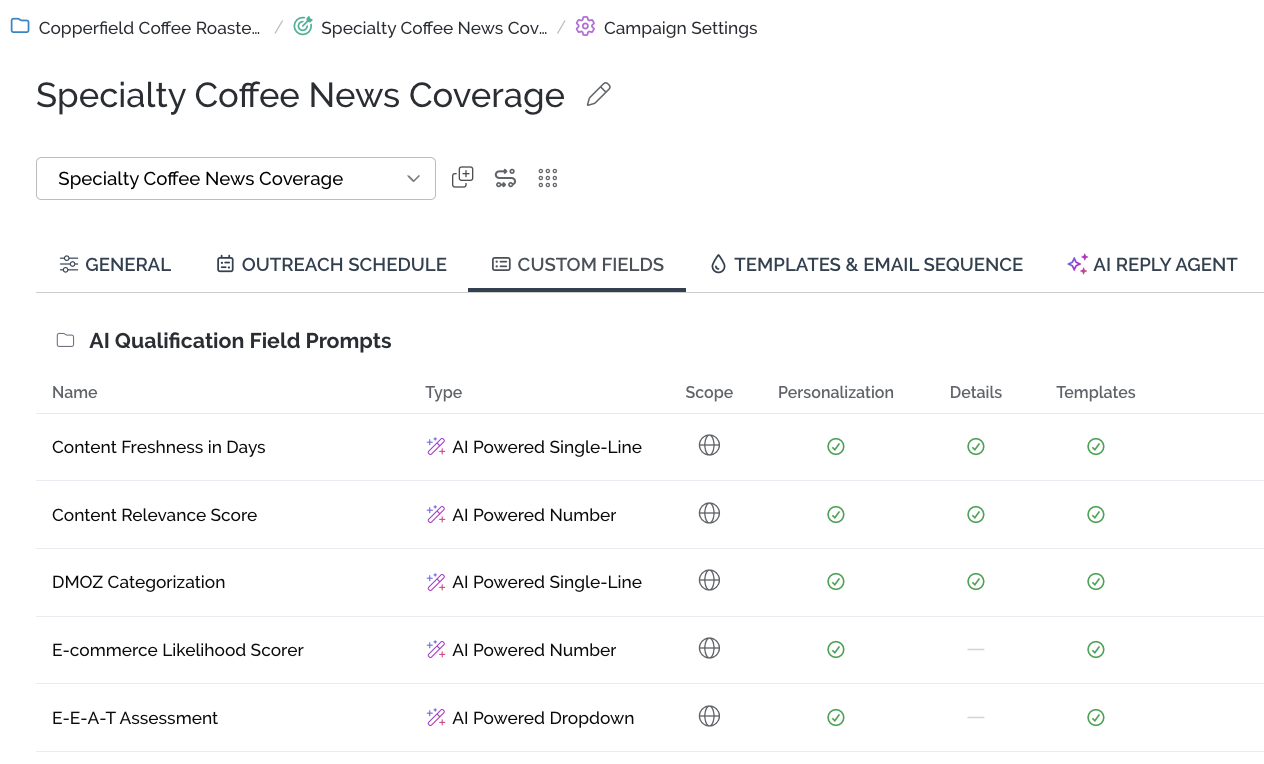
Either place leads to the same underlying field. There is no separate "campaign version" and "global version" of a field. Creating or editing a field from a campaign simply connects it to that campaign for you automatically.
How to Set or Change Scope
- Open the field (from campaign settings or Settings → Custom Fields) and go to the scope step.
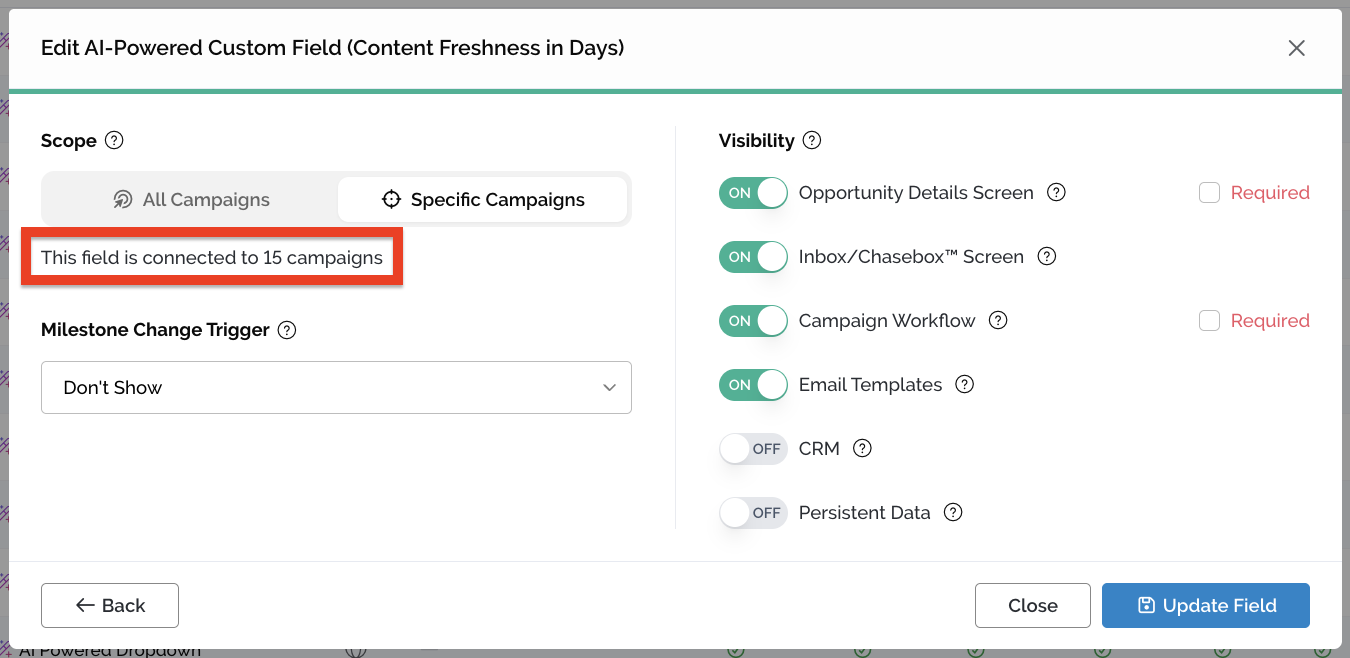
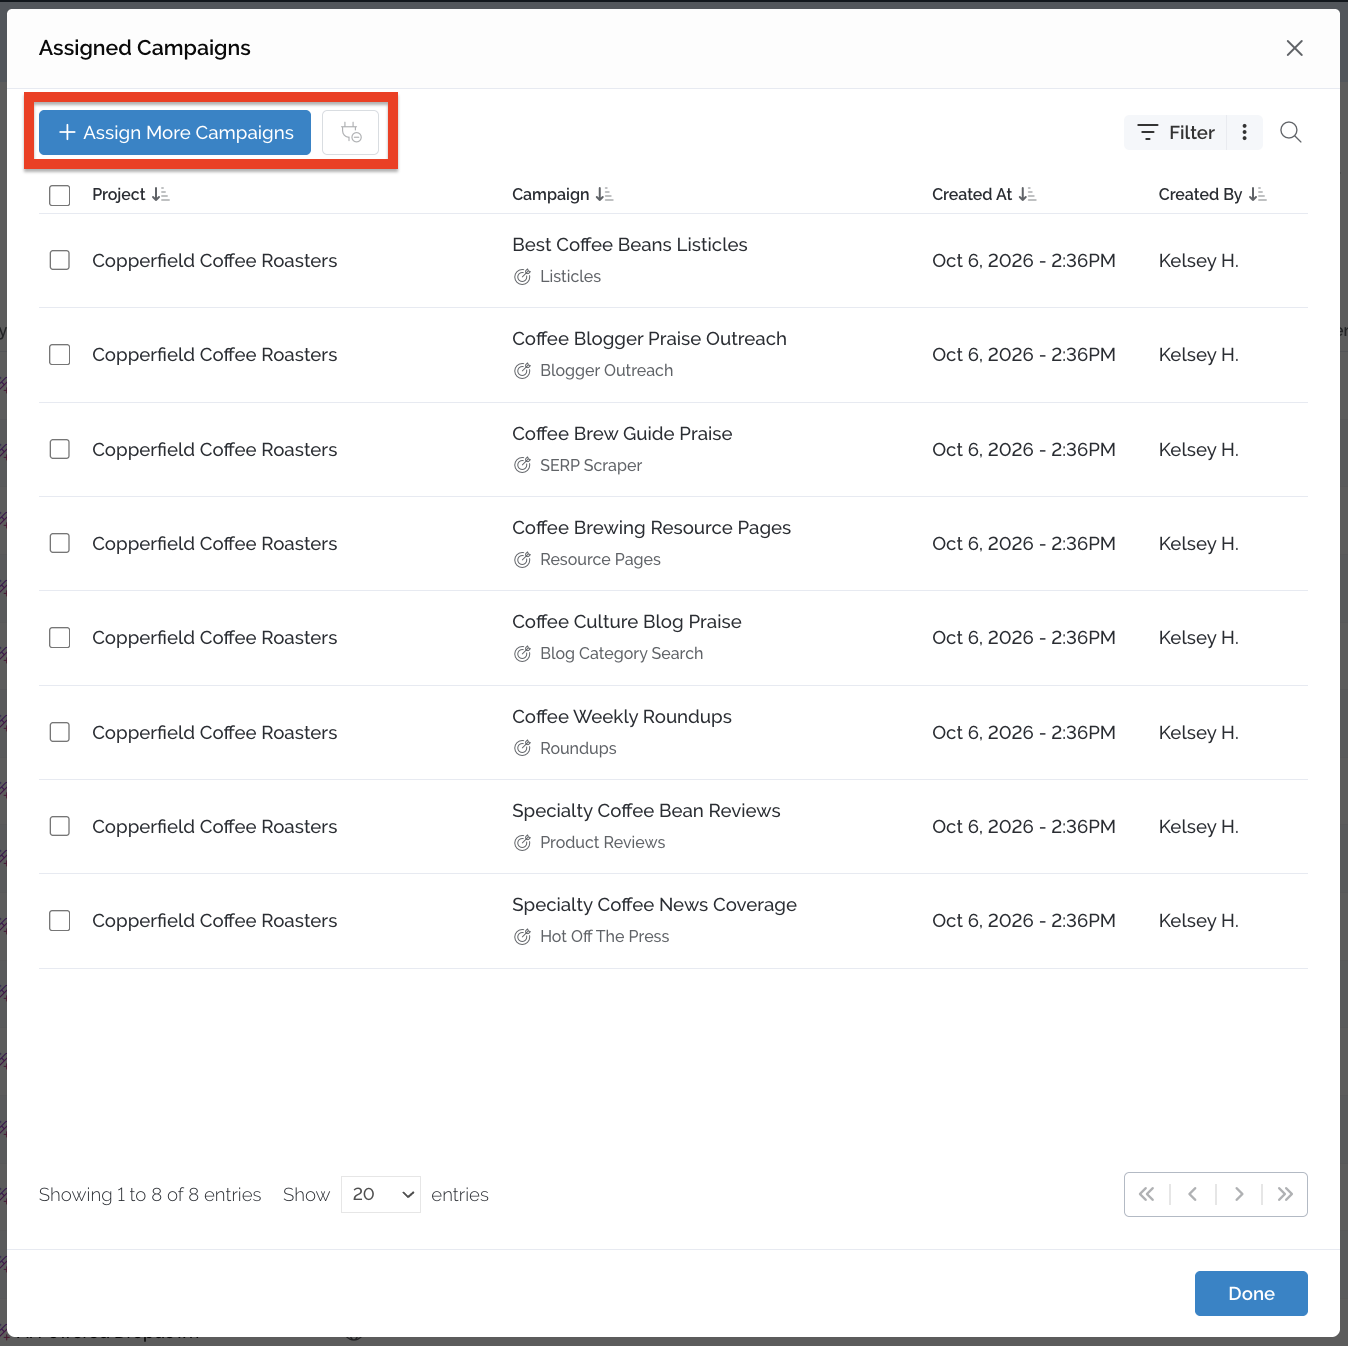
- To add campaigns, click This field is connected to x campaigns, select the project, and choose the campaigns you want the field connected to.
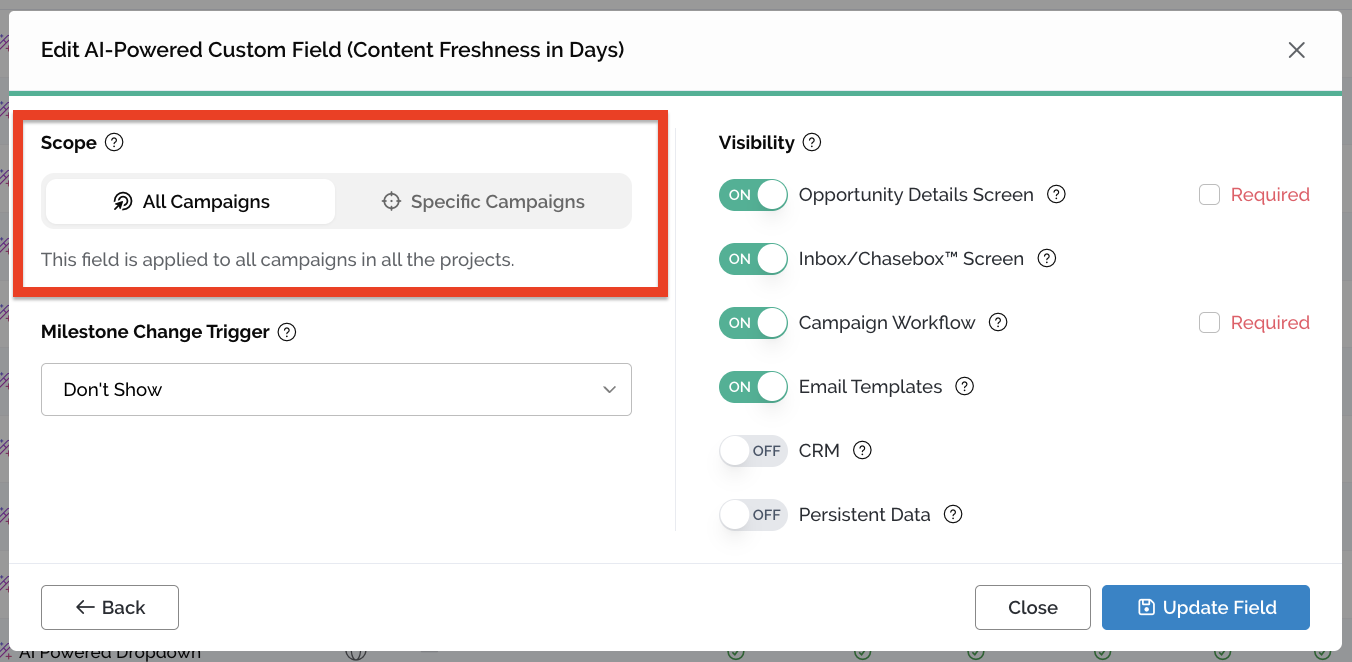
- To apply it everywhere, switch the toggle to All Campaigns.
- Save. The field is now live in every campaign it's connected to.
Scope controls which campaigns have the field. Visibility controls where the field appears inside those campaigns. You need both set correctly for a field to show up where you expect.
If your account previously used Personalization Fields, you'll also see a Migrated Fields group, which holds all of your old campaign-specific personalization fields, now converted into Custom Fields.
🤖 Field Types: AI-Powered vs. Static
Every custom field is set up as one of two types:
| Type | What it does |
|---|---|
| AI-Powered | The value is generated automatically by an AI prompt, for example a content relevance or quality score. When creating one, click Validate to test the prompt. This runs it and shows you a prompt effectiveness score in the right panel, so you can confirm it works before saving. |
| Static | You or your team enter the value manually. Static fields have their own data formats (see below) that control how the value is entered. |

🗂️ Static Field Types
When you create a static field, you'll choose the data format that best matches the information you're capturing. The format controls how the value is entered and helps keep your data consistent:
| Format | Use it for |
|---|---|
| Single Line | The most commonly used type. Short data such as a blog name, site title or category. |
| Multi-Line | A few sentences of freeform text, such as notes about a site or a thought to reference during personalization. |
| Number | Numeric values only, such as scores, counts or costs. |
| Date | Dates you want to track or reference in outreach. |
| URL | Links you want to store or insert into emails. |
| Dropdown | A fixed list of options. Enter each option on its own line when setting up the field. Best choice for standardizing data, since users pick from your list rather than typing free text. |
| Checkbox | A checkbox that can be enabled or disabled. |
| Currency | Monetary values. You can set the specific currency to be applied to all Custom Fields. |
| On/Off Toggle | A toggle that can be enabled or disabled. |
| Star Rating | A 5-star rating system to qualify your opportunities. |
Tip: if you plan to report on a field, Dropdown and Number give you far cleaner data than free-text fields.
➕ Adding a Custom Field
There are three places you can add a field. All three lead to the same setup flow: name, type, scope and visibility.
From Campaign Settings
- Open the campaign and go to Custom Fields Settings.
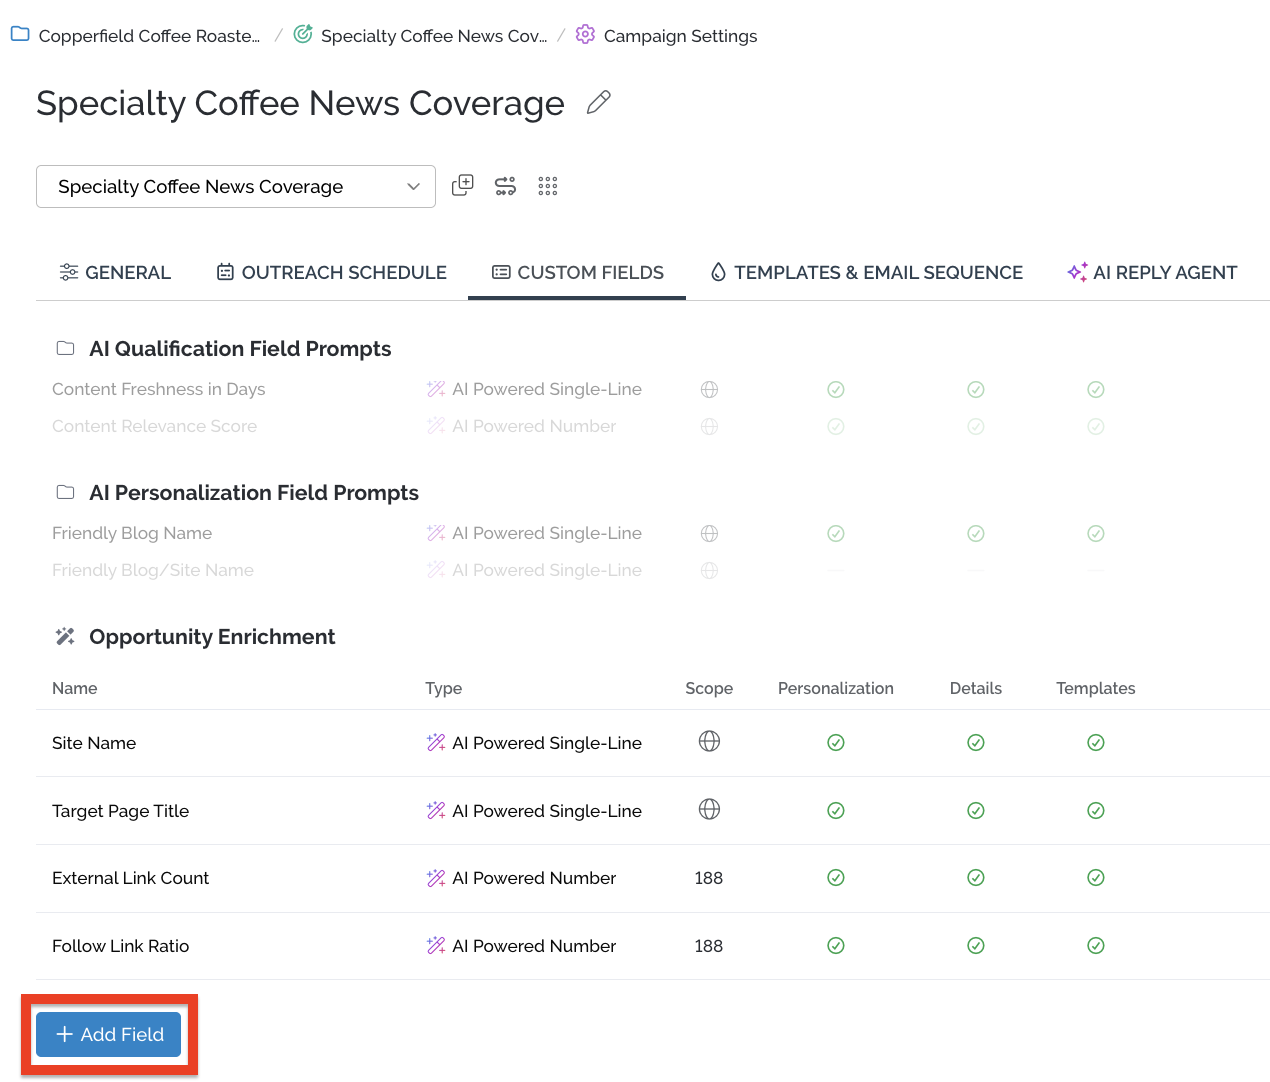
- Choose Add Field to pull in one that already exists in your library, or create a new one.
- If creating new, select AI-Powered or Static, then name and configure the field.
- For an AI-Powered field, click Validate to test the prompt and preview the result.
- Set the scope, then set visibility, and save.
From Settings → Custom Fields (Global)
- Go to Settings → Custom Fields.
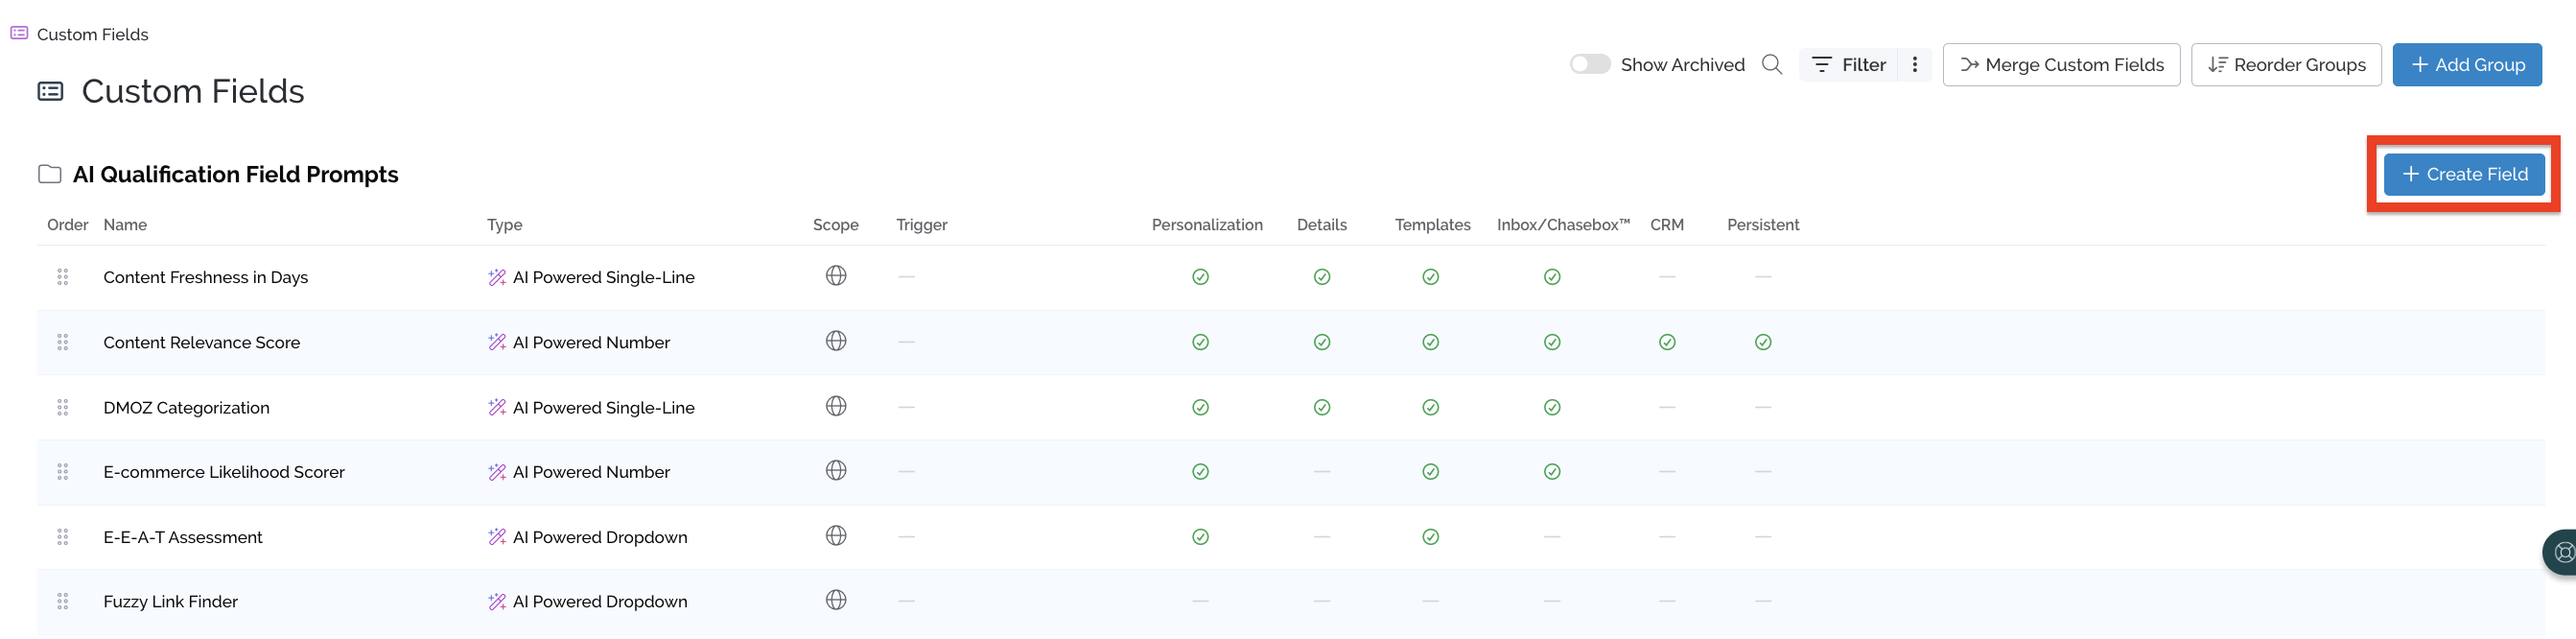
- Choose the group you want the field to live in, then click + New Custom Field.
- Complete the same steps: type, name, scope and visibility. Because you're not inside a campaign, no campaign is pre-selected, so set the scope deliberately.
From an Email Template
- On the template screen, find the Custom Fields section on the right and click + Add Field.
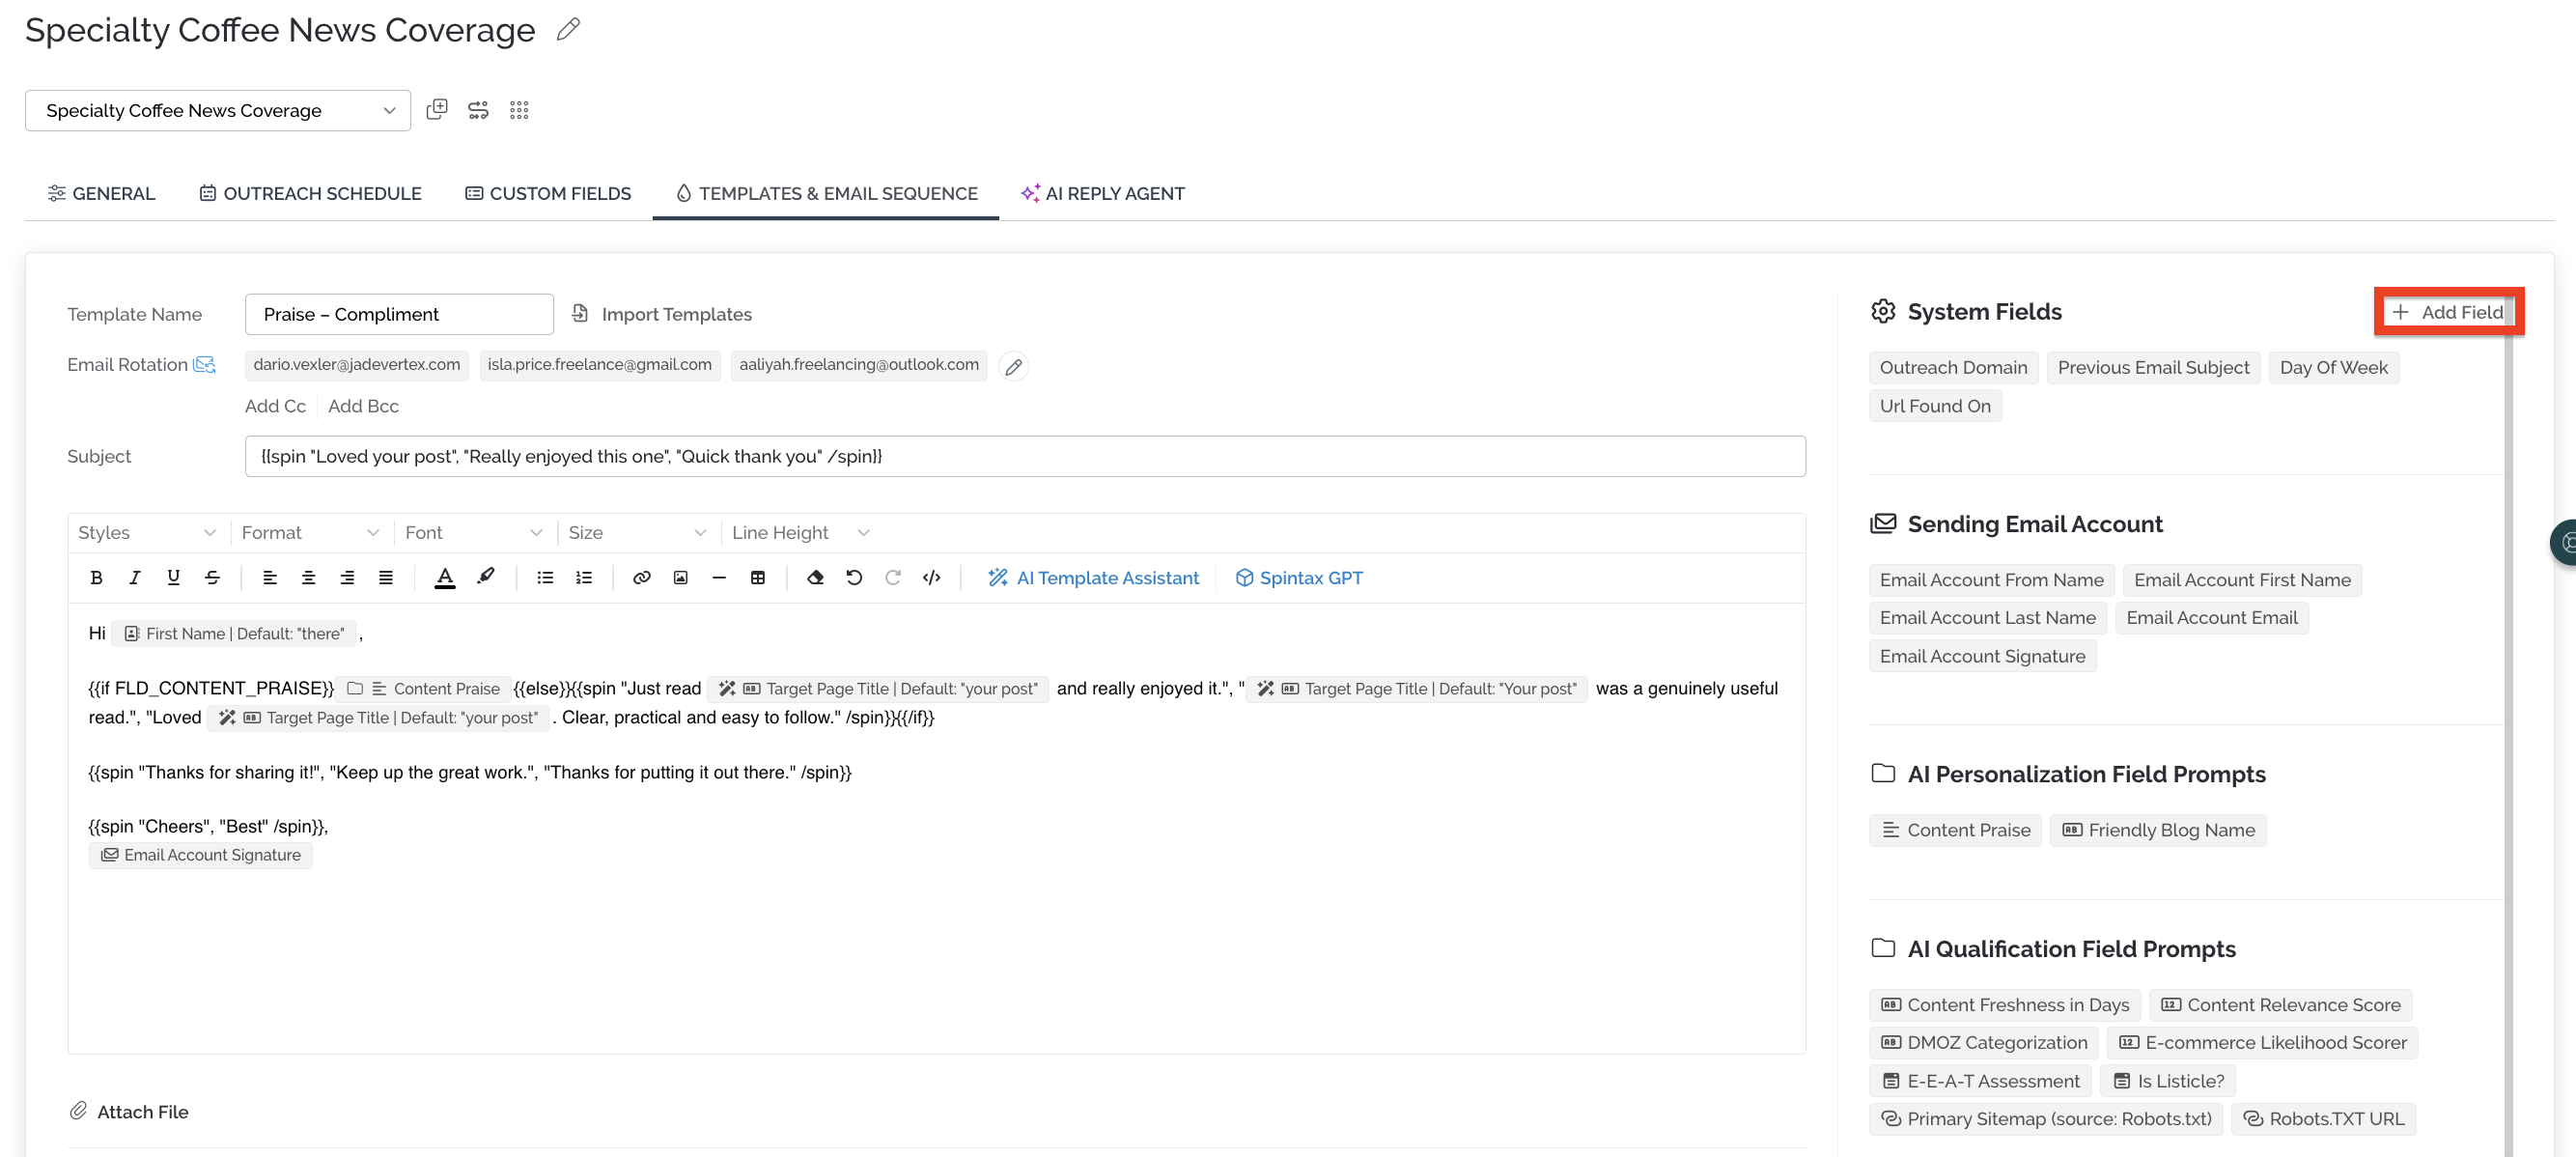
- Select Add a New Field from the drop-down.
- Name the field, mark it Required if needed, choose its format, and add help text as a reminder for yourself when personalizing.
Remember: a field added from a template still needs Email Templates visibility enabled to appear in your template list.
📁 Organizing Fields With Groups
Custom Fields live inside groups. Groups keep your library readable as it grows, and they control how fields are presented to your team on the Opportunity Details page, so a well-structured set of groups doubles as a workflow guide.
Creating a Group
- Go to Settings → Custom Fields and click Add Group.
- Give the group a name that reflects the stage or purpose of the fields it will hold.
- Assign an icon for quick visual reference.
- Click + Create Field to start adding fields into the group.

Grouping by Workflow Stage: Examples
The most effective way to structure groups is around the moment in your workflow when the data gets entered. For example:
- Site Qualification – fields your team fills in while deciding whether a site is worth pursuing: content type, placement type, domain quality score, an AI-powered relevance score.
- Won Details – fields captured when an opportunity is marked Won: placement URL, live date, cost paid, content type delivered, anchor used. A built-in group called Win Details ships with your account for exactly this purpose.
- Lost Details – fields captured when an opportunity is marked Lost: reason for loss, price quoted, whether to revisit later. Understanding why deals fall through is often as valuable as tracking the ones that close.
- Partner Database – durable facts about the site or contact that stay true across campaigns: preferred contact method, turnaround time, rate card, niche, relationship owner. These are strong candidates for All Campaigns scope and Persistent Data.
Why This Structure Works
- Your team sees only the fields relevant to the stage they're working in, rather than one long undifferentiated list.
- Pairing a group with the Milestone Change Trigger (for Won/Lost groups) prompts users for the data at exactly the moment they have it.
- Clean, stage-based groups produce far more useful Custom Field Reports, since related fields report together.
🔀 Reordering Groups and Fields
Order matters: it's the order your team will see fields in while working through an opportunity. You can control both the order of groups and the order of fields within them.
- To reorder groups – use the reorder button in the top right of the Custom Fields dashboard.
- To reorder individual fields – drag and drop them into position directly from the main dashboard.
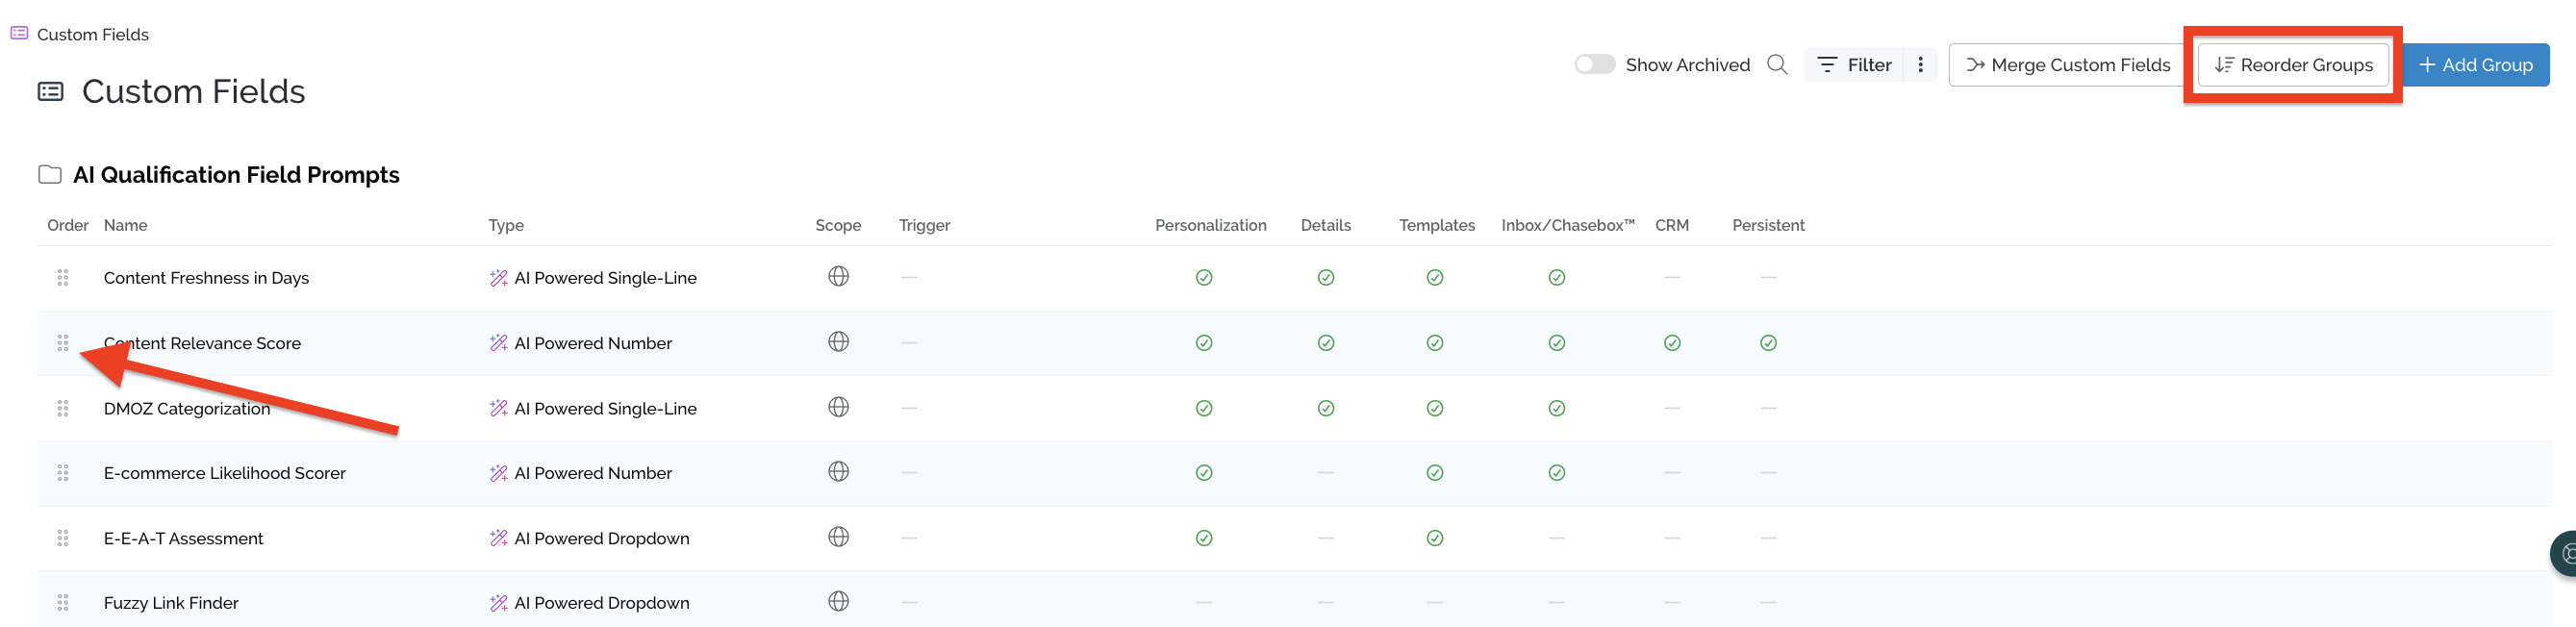
Tip: order your groups to match your workflow, with qualification fields first and win/loss details last, so the layout mirrors how your team actually moves through an opportunity.
🔗 Merging Custom Fields
Over time, teams often end up with several fields that hold the same kind of information under different names, such as "Page Type" on one campaign, "Page Type 1" on another and "Content Type" on a third. Merging lets you consolidate them into a single field without losing anything.
How Merging Works
- Go to Settings → Custom Fields.
- Select the fields you want to consolidate, for example Page Type and Page Type 1.
- Choose the field name you want to keep as the single, surviving field, for example Content Type.
- Confirm the merge.
After merging, every campaign that used any of the original fields now references the one shared field.

What Happens to Your Data
- Data is merged into the Target Field. If the Target Field already contains information, the data from the Source Field is removed and the existing information in the Target Field is retained. If the Target Field is empty, the information from the Source Field is migrated to the Target Field.
- The label changes. That data now displays under the single merged name (the field it was merged into).
- Your campaigns keep working. Each campaign continues to collect the same information, just under one consistent name from now on.
Merging is the recommended cleanup step if naming has drifted across campaigns over the years. It gives you one consistent field to personalize with, filter on and report against, instead of three variations of the same idea.
👁️ Visibility Settings
Visibility controls where a field actually appears in the tool. Each location is toggled independently, so you can surface a field exactly where it's useful and keep it out of the way everywhere else.
| Location | What turning it on does |
|---|---|
| Opportunity Details Screen | Displays the field on the right side of the Opportunity Details page. |
| Personalization Detail Screen (Workflow) | Makes the field viewable and editable during the personalize stage. |
| Email Templates | Makes the field available to insert into your email templates. |
| Inbox / Chasebox | Surfaces the field while you're managing replies and follow-ups. |
| CRM | Makes the field visible in your CRM views. |
| Milestone Change Trigger | Prompts the user for a value when a specific milestone is changed. Ideal for Won/Lost data. |
| Persistent Data | Carries the field's values forward when you create a Cherry-Pick campaign. |
Troubleshooting: if a field you created doesn't appear where you expect (most often when building an email template), visibility is almost always the cause. Open the field, go to the Visibility step, and confirm the relevant location is turned on.
✅ Required Fields and Data Standardization
Marking a field as Required is the main lever for making sure data actually gets captured rather than skipped. You can set a field as required on the Opportunity Details Screen, the Personalization Detail Screen and the Milestone Change Trigger, wherever you've chosen to show it.
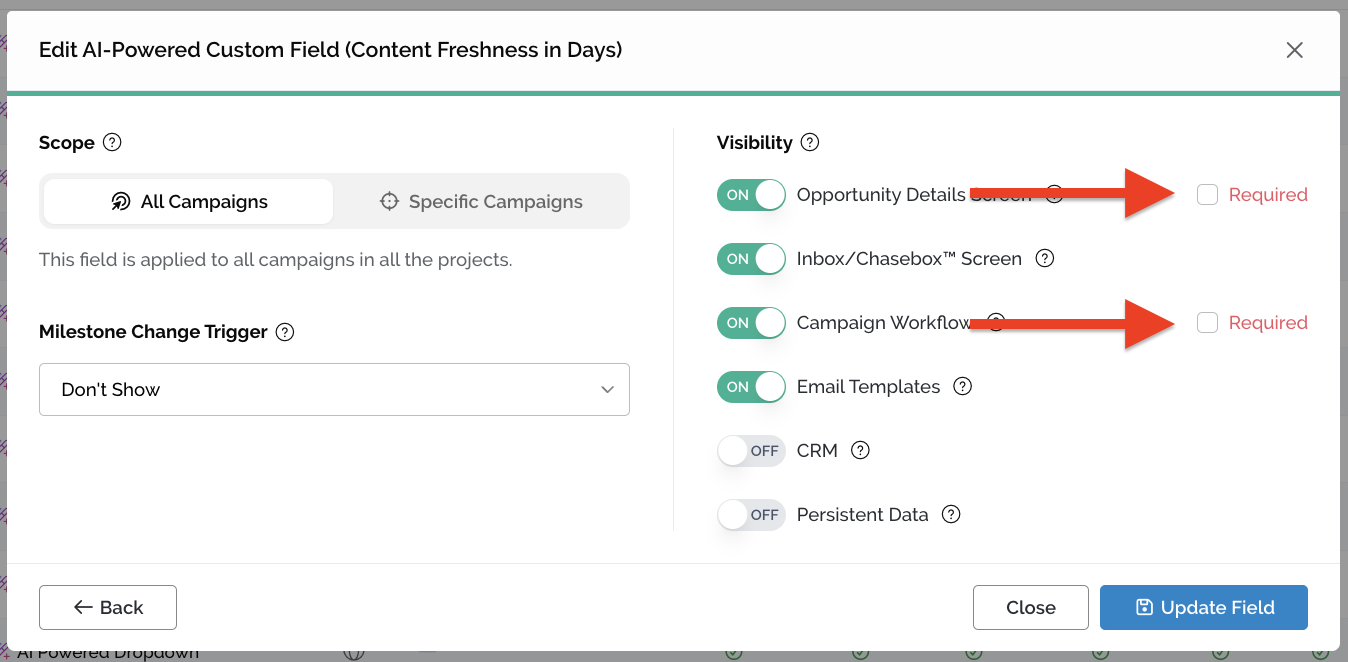
How Required Fields Behave
- An opportunity can't move to Compose until its required fields have values.
- If you add a required field to a campaign after opportunities have already reached Compose, those opportunities are moved back to Personalize so the data can be filled in.
- With a Milestone Change Trigger, the prompt appears at the moment the milestone changes, so Won/Lost data gets captured while it's fresh.
Getting Standardization Right
- Require the fields you report on. If a field feeds a report or a partner database, requiring it prevents gaps that make the report unusable.
- Pair Required with Dropdown. Requiring a free-text field guarantees something is entered, but not that it's consistent. A required dropdown guarantees both.
- Don't require everything. Too many required fields slow your team down and encourage junk entries just to move an opportunity forward.
✏️ Editing, Removing and Deleting Fields
From inside a campaign, you can:
- Remove the field from just that campaign, without affecting its connection to any other campaign.
- Edit the field directly from the campaign view. Note that editing here updates the field everywhere it's connected, across every campaign, not just the one you're viewing. Pitchbox will tell you this when you open the editor.
You can also manage the same field from Settings → Custom Fields, where the create and edit experience is identical.
Deleting a field entirely (from Settings → Custom Fields) removes it, and all data ever entered for it, from every connected campaign. This can't be undone. If your goal is to consolidate duplicates rather than discard data, merge the fields instead.
🔐 Who Can Manage Custom Fields
Custom fields can be managed by account admins and by any user who has been granted the Manage Custom Fields privilege.
🔄 Migrating From Personalization Fields
For older users, any personalization fields you already had set up on your campaigns are automatically migrated into Custom Fields.
- No data is lost. Every value you've already entered stays exactly where it is.
- Email templates don't change. You'll keep using the same fields in your templates; you'll just manage them through Custom Fields instead of Personalization Fields.
- Nothing needs to be rebuilt. Migrated fields keep their names, types and values. You only need to revisit them if you want to change scope, merge duplicates or adjust visibility.
Post-migration, the natural cleanup steps are to merge any fields that duplicate each other across campaigns, group the survivors by workflow stage, and set scope so shared fields apply to all campaigns.
📊 Tracking Custom Field Data
Once your fields are populated, you can track and report on them using Custom Field Reports. Well-structured groups, dropdown formats and required settings all pay off here; they're what make the resulting reports complete and consistent.
💬 Need more help? Email pitchbox@support.com or use the live chat and our team will be happy to help.