
Campaign Settings: Custom Fields
Custom Fields let you capture important data about your opportunities, such as the title of a recent blog post or the name of a blog, and fill it into your email templates automatically for more personable, time-saving outreach. This article covers how to manage Custom Fields from a campaign's settings, including adding fields, setting their scope and visibility, making fields required, and editing or removing them.
Navigation
- Finding Custom Fields in Campaign Settings
- How Campaign Custom Fields Work
- Adding a Custom Field
- Setting the Scope
- Setting the Visibility
- Required Fields
- Editing and Removing Fields
📍 Finding Custom Fields in Campaign Settings
To manage Custom Fields for a campaign, open the campaign's settings and select Custom Fields. For older users, this is where Personalization Fields used to be.

Note: any personalization fields you already had are automatically migrated to Custom Fields. No data is lost, and your email templates keep working as before.
⚙️ How Campaign Custom Fields Work
Custom Fields added from your campaign settings are the same fields that live in your account's full field library under Settings → Custom Fields. There's no separate campaign version of a field. When you create or add a field from a campaign, that campaign is simply connected to the field for you automatically.
You can read an in-depth guide about how Custom Fields work here.
➕ Adding a Custom Field
- Open the campaign and go to Custom Fields.
- Click Add Field to pull in a field that already exists in your library, or create a new one.

- If you're creating a new field, select AI-Powered or Static, then name and configure it.
- AI-Powered – the value is generated automatically by an AI prompt. Click Validate to test the prompt and preview the result before saving.
- Static – you or your team enter the value manually.

- Set the scope.
- Set the visibility, then save.
🌐 Setting the Scope
Scope controls which campaigns a field applies to:
| Scope | What it means |
|---|---|
| Specific Campaigns | The field applies only to the campaigns you select. When you create a field from inside a campaign, that campaign is selected automatically. To connect more campaigns, click Add More, select the project, and choose the campaigns. |
| All Campaigns | The field applies to every campaign you have now and any you create later. |
👁️ Setting the Visibility
Visibility controls where the field appears inside the campaigns it's connected to. Each location is turned on separately:
| Location | What turning it on does |
|---|---|
| Opportunity Details Screen | Displays the field on the right side of the Opportunity Details page. |
| Personalization Detail Screen (Workflow) | Makes the field viewable and editable during the Personalize stage. |
| Email Templates | Makes the field available to insert into your email templates. |
| Inbox / Chasebox | Shows the field while you manage replies and follow-ups. |
| CRM | Makes the field visible in your CRM views. |
| Milestone Change Trigger | Prompts the user for a value when a specific milestone changes. |
| Persistent Data | Carries the field's values forward when you create a Cherry-Pick campaign. |
Troubleshooting: if a field doesn't show up where you expect, especially in your email templates, check that the right visibility location is turned on.
✅ Required Fields
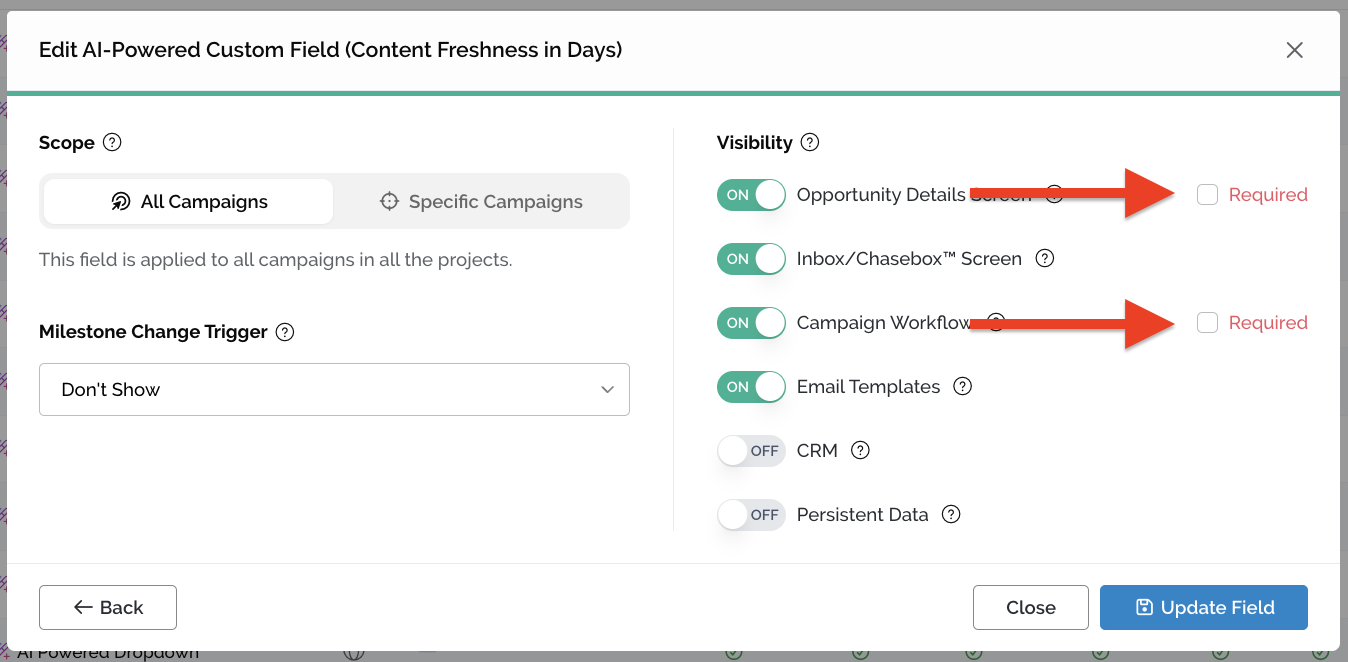
You can mark a field as Required so the data always gets filled in.
- An opportunity can't move to Compose until its required fields have values.
- If you add a required field after opportunities have already reached Compose, those opportunities are moved back to Personalize so the data can be completed.
✏️ Editing and Removing Fields
From your campaign's Custom Fields settings, you can:
- Remove a field from just this campaign, without affecting any other campaign it's connected to.
- Edit a field directly. Editing a field here updates it everywhere it's connected, across every campaign, not just this one. Pitchbox will remind you of this when you open the editor.
To delete a field entirely, merge fields, or organize them into groups, go to Settings → Custom Fields.
💬 Need more help? Email pitchbox@support.com or use the live chat and our team will be happy to help.