
Work Smarter With AI Agents: The Definitive Guide

Meet your new Outreach Specialist who never clocks out. Pitchbox's AI Agent works every conversation, 24/7, until it closes and gets your links!
It reads every incoming reply, understands the intent behind the message, and automatically generates personalized responses designed to move each conversation toward your desired outcome. From initial engagement through to a successful win, the AI Agent helps eliminate manual inbox management, accelerate campaign performance, and free up your team.
The result? More conversations progressing, less time spent in your inbox, and a more scalable outreach process. 🚀
It can:
✅ Respond to inbound emails on your behalf
✅ Negotiate pricing within your defined limits
✅ Handle topic and content requests
✅ Schedule and send follow-up chase emails
✅ Close opportunities as Won or Lost based on the conversation
You configure it once. After that, AI Agent handles replies around the clock, even while your team sleeps. 😴
Pitchbox AI Agents & Playbooks Tutorial
Navigation:
- Agent vs Playbook Basics
- Configuring AI Agents
- Playbook Conditions and Timing
- Preview and Customize Replies
- Exit Criteria
- Wins and Losses
- Running an Agent on an Existing Inbox
- Reviewing Existing Wins
- Running Replies Marked as Skipped
- Building Your Own AI Agent
- Preview and Next Steps
- FAQ
🤖 Agent vs Playbook Basics
The AI system has two components that work together. You need both. 👈

| 🧠 AI Agent = The Brain or "Employee" | 📋 AI Playbook = The Delivery System |
|---|---|
|
Reads the incoming email Understands context before deciding what to say |
Controls when and how the reply is sent Handles the delivery logistics end-to-end |
|
Decides what to say Generates a reply based on your specific instructions |
Sends automatically OR saves as a draft Your choice: hands-off or manual review first |
|
Applies your tone, topics, and pricing rules Follows your configured guidelines every time! |
Adds a natural wait time before sending Randomized delay so replies don't look instant |
|
Determines if the goal has been reached Evaluates exit criteria after each reply |
Schedules follow-up chase emails Keeps pinging until you get a response (set amount per contact) |
|
Marks opportunities as Won or Lost Updates milestones and applies automatically |
Sets rules for when AI should skip an email Protects Won, Lost and Almost There deals |
📋 NOTE
Think of it this way: the AI Agent writes the email. The Playbook decides when, and whether, it gets sent.
When setting up AI automation on a campaign, you always configure both in a two-step process:
- Select or create your AI Reply Agent,
- Assign an AI Playbook to it.
⚙️ Configuring AI Agents
Each AI Agent is built around three sections: a Campaign Goal → Instructions → Exit Criteria.
To configure a new or existing agent head to your AI Agents page.

1️⃣ Campaign Goal
This tells the AI what it is working toward. Every reply it generates is shaped by this goal. Set it specifically so the AI knows exactly what winning looks like for your campaign.
👉 Example:
"Get the prospect to agree to publish our guest post on their site. If they have conditions (pricing, guidelines, topic preferences), work toward an agreement that meets both sides. The conversation is successful when they confirm they will publish or provide clear next steps for submission."
2️⃣ Instructions
How should the AI behave? The AI Agent follows these rules in every reply. Covers pricing, negotiation logic, topics, writing samples, and your preferred tone of voice. Here are some areas to consider:
| Area | What to include |
|---|---|
| Tone 💅 | Formal, conversational, enthusiastic, neutral |
| Topics 💡 | List the subjects you can write about |
| Writing samples 📝 | How to respond if samples are requested |
| Payment policy 💸 | Whether you pay, your range, your hard cap |
| Negotiation 🗣️ | e.g. "Counter at 30–45% of asking price" |
| Custom variables ⚗️ | Opportunity-specific fields (name, URL, etc.) |
👉 Example payment instruction:
"If payment is requested, offer 30–45% of the asking price. Do not agree to more than $150."
3️⃣Exit Criteria
Defines when the conversation is won - or lost. Once either type of criteria is met, the AI Agent applies tags and sets the milestone status automatically, so the opportunity is logged in your pipeline correctly without manual review. 😍
| Type | Purpose | Example Criteria |
|---|---|---|
| ✅ Positive (Win) | Marks the opportunity as won and triggers a sign-off | "Guest post accepted and URL received" · "Price and placement confirmed" · "Backlink agreement finalized" |
| ❌ Negative (Loss) | Marks the opportunity as lost and stops outreach | "Prospect declines or unsubscribes" · "No response after 3 follow-ups" · "Site doesn't accept paid/guest content" |
⏱️ Playbook Conditions and Timing
Playbooks control when the AI is allowed to act and what happens after it does.

1️⃣ Conditions
Conditions are gates that stop the AI from acting on certain opportunities. Recommended defaults:
- Skip if milestone is Almost There
- Skip if milestone is Won
- Skip if milestone is Lost
💡 TIP
You can add more conditions at any time.
2️⃣ Sending Mode
| Mode | When to use it |
|---|---|
| 🏃 Send automatically | You trust the AI and want hands-off operation |
| ✋Save as draft | You want to review replies before they go out |
3️⃣ Wait Time
Set a randomized delay between receiving an email and sending the AI reply. This makes responses look natural rather than instant.
- Recommended range: 5–20 minutes
- For tighter windows: 5–15 minutes
4️⃣ Chase-Up Scheduling
If a target doesn't respond after the initial reply, the Playbook can automatically send follow-up emails.
- Use Adaptive AI Chase-up for dynamic, contextual follow-ups
- Set a preferred send time, or let AI choose the optimal window
💡 TIP
Always exclude Won, Lost, and Almost There and Negotiation milestones from your conditions. This prevents the AI from interfering with deals your team is actively closing.
🔍 Preview and Customize Replies
Before activating an agent, always preview it against a real email to confirm it responds in the way you desire.

How to Preview
- Open the AI Agent configuration screen
- Click Preview AI Reply Sample
- Pitchbox pulls a real email from your inbox and generates a sample reply
- You can choose to Re-generate a preview for that message or pick a specific email from your inbox
- Run it 2–3 times, each run produces a slightly different email by design 💪
What to Check in the Preview
- Is the tone correct?
- Are the right topics mentioned?
- Is pricing handled within your limits?
- Does it handle the specific scenario in the email?
Editing the Agent
If the preview does not look right, adjust and preview again. Common fixes:
- Tighten the campaign goal wording
- Add instructions for edge cases (unusual pricing, specific questions)
- Update the topics list or payment cap
💡 TIP
Test your agent against edge-case emails, pricing questions, complex requests, pushback etc. Catch instruction gaps now, not in a live campaign.
👋 Exit Criteria
Exit criteria tell the AI when to stop. Without them, the AI doesn't know the goal has been reached, or when to give up. 🥵
Positive Exit Criteria ( A Win )
Define what success looks like. Examples:
- Target agreed to your price
- Target accepted your offer or negotiated one you accepted
- Target confirmed they want to move forward
When triggered, the AI will:
- Send a sign-off email
- Set the milestone (e.g. Almost There)
- Apply your chosen tags (e.g. "AI Won")
- Stop sending further replies
Negative Exit Criteria ( A Loss )
Define when to stop pursuing an opportunity. Examples:
- Target said they are not interested
- Price negotiation failed beyond your hard cap
- No response after all chase attempts
When triggered, the AI will:
- Mark the opportunity as Lost
- Apply your chosen tags (e.g. "AI Lost")
- Stop all further automated replies
💡 TIP
Use tags like "AI Won", "AI Lost", and "AI Negotiated" so you can track AI performance over time and identify which campaigns benefit most from automation.
🏆 Wins and Losses
✅ A Win — What Happens
|
1 |
AI detects the positive exit criteria was met e.g. "Target confirmed she wants to move forward and will publish" |
|---|
|
2 |
AI sends a sign-off email e.g. "Fantastic! Really great to hear that." |
|---|
|
3 |
Milestone is set to Almost There Your team picks it up from here - e.g. to write and submit content |
|---|
|
4 |
Tags are applied and AI stops replying e.g. "AI Won" tag is added to the opportunity |
|---|
❌ A Loss — What Happens
|
1 |
AI detects the negative exit criteria was met e.g. "Target said they are not interested" |
|---|
|
2 |
Opportunity is marked as Lost AI applies your configured tags and stops all further activity |
|---|
📋 NOTE
For link inserts and niche edits, the AI can drive the conversation further, all the way to placement confirmation, before marking as Won. Guest posts stop at Almost There because content still needs to be written.
⚡ Running an Agent on an Existing Inbox
When you activate an AI Agent, it processes new emails from that point forward. Emails that arrived before activation are not touched, unless you trigger it manually.
How to Run the Agent on Existing Emails
- Go to your campaign inbox
- Select the emails you want the AI to process (you can select all)
- Click Run AI Reply Agent
- Wait approximately one minute for the agent to process
✅ Result
Emails that disappear from your inbox have moved into the Agent Flow, the AI is now managing them. Emails that remain were skipped (see Chapter 10 for how to handle these).
Checking the Agent Flow
After running, go to the Agent Flow view to see:
- Which emails were processed
- The current milestone for each opportunity
- Whether chasing has been enabled
📋 NOTE
Emails already responded to before the AI was configured will be evaluated by the AI as if new, it will send a reply or flag the email for manual review.
🥇 Reviewing Successful Wins
Every won opportunity in the Agent Flow includes a complete audit trail of what the AI did and why it considered the goal reached.
What You See in the Agent Flow for a Win
| Event | What it means |
|---|---|
| Agent was executed | AI read the email and composed a reply |
| Draft was created | Reply was written and queued |
| Email was sent | Reply was delivered to the target |
| Chasing was active | Follow-ups were scheduled in case of no response |
| Goal was met | Exit criteria were satisfied — opportunity closed as a win |
The AI's Reasoning
When you click into a won opportunity, you will see:
- A plain-English summary of why the AI declared the goal reached
- A direct quote from the target's email that triggered the decision
- A record of the sign-off email sent by the AI
💡 TIP
Regularly review won and lost opportunities in the Agent Flow. If the AI is declaring wins too early, tighten your positive exit criteria. If it is missing genuine wins, broaden them.
⛔ Running Replies Marked as Skipped
When the AI cannot respond confidently, it skips the reply and flags the email in your inbox rather than risk sending something incorrect.
Common Reasons for a Skip
| Reason | Example |
|---|---|
| Missing personalization fields | Target asked about topics but no topics are in the opportunity record |
| Missing opportunity details | Name, blog URL, or pricing not filled in |
| Instructions gap | Target asked a question your agent instructions do not address |
How Skips Appear
Skipped emails stay in your inbox with a tag indicating 'AI Reply Failed'. Open the opportunity detail to see the exact skip reason.
📋 NOTE
Example skip reason: "Email asked about pricing and content topics, but personalization fields (name, topics) were empty, impossible to generate an accurate response."
How to Resolve a Skip
- Read the skip reason in the opportunity detail
- Fill in any missing fields on the opportunity record
- Update your agent instructions to cover the missed scenario
- Manually reply if the situation is too nuanced for automation
Pitchbox will sometimes suggest specific instruction edits to prevent the same skip from happening again.
⚠️ IMPORTANT
Skips are a safety feature. A skipped email in your inbox is far better than a wrong reply being sent to a potential link partner.
🤖 Building Your Own AI Agent
Pitchbox gives you a pre-configured library to start from. You can use these as-is, customize them, or build entirely new agents for specific niches.
How to Create a New Agent
- Click AI Agents in the top-right corner
- Click New AI Agent
- Choose a template from the AI Prompt Library (Chase-ups or AI Replies)
- Customize the Campaign Goal, Instructions, and Exit Criteria for your niche
- Click Preview to validate the output
- Click Create and assign the agent to a category
Customizing for a Niche - Example (Fitness)
| Setting | What to change |
| Topics | List your specialisms: fitness equipment, weight loss, nutrition |
| Payment cap | "Do not pay more than $50 per placement" |
| Tone | Adjust to match your brand voice |
| Agent name | Use a clear name: "Guest Post — Fitness" |
Applying to Campaigns
- From the new agent's detail page, select your project
- Choose the campaigns to apply it to
- Select a Playbook to pair it with
- Save — the agent activates immediately on new inbound emails
💡 TIP
Name agents descriptively: e.g. Guest Post - Fitness or Link Insert - Finance. This makes it fast to select the right agent when configuring new campaigns.
👀 Preview and Next Steps
Before going live, use the Preview function to validate every new agent and playbook configuration.
Final Pre-Launch Checklist
| Item | Status check |
| 1️⃣ AI Agent configured | Campaign goal, instructions, exit criteria all set |
| 2️⃣ Payment rules defined | Hard cap and negotiation range specified |
| 3️⃣ Topics and tone set | Instructions match your brand voice and niche |
| 4️⃣ Preview tested | Run 2-3 times and output looks correct |
| 5️⃣ Playbook conditions set | Won, Lost, Almost There milestones excluded |
| 6️⃣ Sending mode chosen | Automatic send or draft for review |
| 7️⃣ Wait time configured | 5-20 min window set for natural responses |
| 8️⃣ Chase-up scheduling active | Adaptive chase-up enabled and timing set |
| 9️⃣ Agent applied to campaign | Project and campaigns selected, playbook paired |
Building Out Over Time
Once your first agent is running, expand systematically:
- Create niche-specific agents for each vertical you work in
- Review the Agent Flow weekly to refine exit criteria
- Expand to link insert and niche edit campaigns where AI can confirm placement
- Check skipped emails weekly to improve instruction coverage
✅ Result
Fastest way to get started: pick one active campaign, apply a pre-configured agent with the Send & Chase Playbook, and monitor the Agent Flow for one week. Use what you see to tune the configuration before rolling it out across all campaigns.
❓ FAQ
Setup & Configuration
Q: Do I need to configure all three AI Agent sections before the AI Agent can go live?
A: Yes. You'll need to complete all three key steps:
- Define the campaign goal
- Provide the agent instructions
- Set the exit criteria
Q: Can I use the same AI Agent across multiple campaigns?
A: Yes. This is especially useful when you have multiple campaigns with similar strategies and goals, but targeting different niches.
To apply the same AI Agent across multiple campaigns:
AI Agents → AI Reply Agents → hover over the agent → Apply to Campaigns → select the campaigns you'd like to update.


This lets you copy the agent configuration across multiple campaigns in bulk, saving time and ensuring consistency.
Q: Can I reference a specific personalization field in my Agent Instructions?
A: Yes, you can instruct the agent to reference specific custom fields, the Opportunity URL (target post), or the domain name.
To do this, open the Agent Builder and type / to bring up the available field tokens, then select the fields you'd like the agent to use.


Q: How specific does my Campaign Goal need to be?
A: The more specific your Campaign Goal is, the better your AI Agent will perform. Think of it as giving the agent a clear definition of success. For example, instead of a broad goal like “build links,” try something more specific, such as:
“Get the prospect to agree to publish our guest post on their site. If they have conditions (pricing, guidelines, topic preferences), work toward an agreement that meets both sides. The conversation is successful when they confirm they will publish or provide clear next steps for submission.”

Q: Can I edit the AI Agent after it's already live on a campaign?
A: Yes, you can edit the AI Agent even after it's live on a campaign. Any changes you make apply immediately, and the agent will use the most recent configuration when handling incoming emails — replies are always generated based on the latest version of your settings.

Q: What is the difference between AI Reply and AI Chase-Up?
A: AI Reply handles responses to incoming emails, generating replies based on the message it receives.
AI Chase-Up is optional and is used to automatically follow up with leads who haven't responded. Enable it if you want the system to run automated follow-up sequences and keep conversations moving forward.

Q: I can't see my AI Agent in my project. How can I fix this?
A: AI Agents need to be assigned to specific projects before they can be used. If you can't see your AI Agent:
AI Agents → AI Reply Agents → select the agent from the left panel → use the top menu → Assign to Project → apply it to the relevant projects.


Q: Should I start with Draft Mode or Automatic Mode?
A: In your Playbook, start with Draft Mode if you want more control and prefer to review each AI-generated reply before it's sent.
Once you've tested your templates across a few different scenarios and you're confident in the responses, switch the same Playbook to Automatic Mode. This lets the agent send replies automatically and helps you scale your conversation management more efficiently.
2. Behavior & Replies
Q: Will the AI Agent send replies without me reviewing them first?
A: It depends on the mode selected in your Playbook:
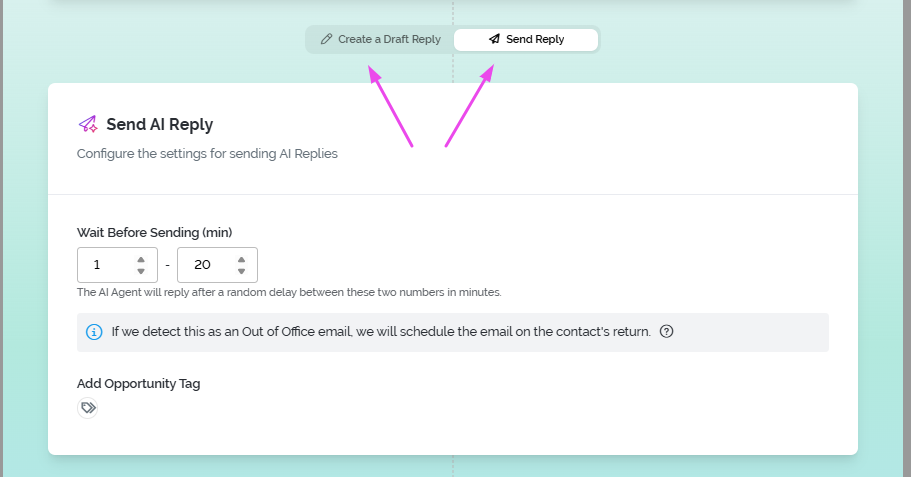
- Draft Mode — the AI Agent generates replies but does not send them automatically. They're saved as drafts for you to review and send manually.
-
Automatic Mode — the AI Agent sends replies automatically, without requiring your review, based on the rules and configuration you've set.
Q: Does the AI Agent send replies based on my campaign outreach schedule?
A: No — and that's by design. 🥇
Your campaign outreach schedule controls your automated outreach sequence (Email 1, Email 2, Email 3); its job is to make initial contact and prompt a response. Once a prospect replies, the goal shifts to keeping the momentum going while they're engaged, rather than waiting for the next scheduled send window.
For example: your campaign runs Monday–Friday, but a prospect replies Saturday at 3am. Rather than leaving them until Monday, the AI Agent steps in after a short delay to respond naturally and keep the conversation alive.
In Automatic Mode it sends the reply for you, and in Draft Mode it writes the reply instantly, ready for you to review when you're back. This can help you keep a lead warm if they replied outside business hours.
Q: How does the AI Agent know what tone to use?
A: The AI's tone of voice is determined by the AI Agent Instructions you provide. In the Instructions section, you can define how the AI should communicate, including your preferred tone, writing style, negotiation approach, pricing guidelines, topics to discuss, and even example responses. The more specific your instructions, the more closely the AI will match your desired communication style in every reply.

Q: Does the AI Agent read the entire conversation history before replying?
A: Yes. If conversation history is available, the AI Agent reviews previous messages in the thread before generating a reply, which helps it respond appropriately based on what's already been discussed.
Q: Why is the AI Agent skipping my messages?
A: If the Agent is skipping messages, it usually means the conversation doesn’t meet the conditions required for the AI Agent to respond.
For example, If the message falls outside your Campaign Goal, Instructions, or Exit Criteria, the AI may intentionally skip it or flag it for human review.


Q: What happens if someone says they aren't the right contact and gives me a new one?
A: If a conversation is redirected to a different contact, the AI Agent will treat this as a new context.
Steps
1. Acknowledge and proceed
The AI can confirm the update and skip the message.
2. Skip the conversation for manual update
Once skipped so you can update the contact details, and restart the automation so the AI continues with the correct recipient.
This ensures conversations stay accurate and aligned with the right contact at all times.
Q: What happens if a prospect asks something outside the AI's instructions?
A: The AI will do its best to respond based on the information and rules it has been given. If it can't confidently handle the request, depending on your configuration it may generate a draft for review, or skip the message and flag the conversation for your attention.
To get the best results, make sure your instructions cover the most common questions, scenarios, and decision-making rules the AI is likely to encounter.
Q: Will the AI Agent ever send a reply I'd completely disagree with?
A: The quality of the AI Agent's replies depends on the guidance you provide. The more detailed your Campaign Goal, Instructions, Examples, and Exit Criteria, the more closely the agent will follow your preferred approach.
If it encounters a situation outside its instructions, it will generate a draft for review or skip the message and flag it for your attention, rather than guessing.
If you're introducing a new AI Agent, use Preview AI Reply Samples in the AI Agent dashboard to test responses against real emails.

For a specific edge-case email already in your inbox, open the AI Agent dashboard, select “Pick Email,” and choose the message you want the agent to practice on.

You can also enable Draft Mode in your chosen Playbook so the agent prepares replies for your review before sending — a good way to fine-tune your setup before moving to full automation.
Q: Does the AI Agent work on all campaign types?
A: Yes. The AI Agent works across all campaign types because it operates within your inbox and responds to incoming conversations, regardless of how the campaign was originally created.
If different campaigns have different goals, workflows, or negotiation strategies, you can create separate AI Agents and Playbooks with their own Instructions, Campaign Goals, and Exit Criteria — tailoring each agent to that campaign's specific objectives.
Q: How does AI Agent work if I'm using Email Rotation on my campaigns?
A: The AI Agent works seamlessly with Email Rotation.
Whether you're using a single email or multiple emails in a rotation, the AI Agent will always respond using the same email address that originally received the conversation.
This ensures continuity in the thread and keeps the conversation consistent from the prospect’s perspective.
Q: What happens if a contact asks to unsubscribe while AI Agent is handling the conversation?
A: If a prospect replies with “unsubscribe”, Pitchbox automatically detects this and immediately adds the contact to the Do Not Email List, blocking all further communications
At the same time, the opportunity is automatically marked as a Loss.
This happens before the AI Agent processes the message, meaning the AI will not attempt to respond or engage with that contact.
Q: What happens if I have Pitchbox Automation already looking after some messages?
A: If you already have Pitchbox Automation managing certain opportunity- or communication-related tasks, those automation rules will run first. The AI Conversation Agent will only process messages after any applicable automation rules have been executed.
This makes the sequence explicit: Automation first → AI Conversation Agent second.
Q: Can the AI Agent reference my campaign personalization data?
A: Yes, if you've enabled “Include Personalization Data,” the AI Agent can use the insights you've collected about a prospect to make its replies more relevant and personalized.
To enable this: AI Agents → AI Reply Agents → hover over your agent → Edit → toggle “Include Personalization Data” on.

3. Control & Oversight
Q: Can I step in and take over a conversation the AI is handling?
A: Yes. There's a short delay between a reply being received and the AI Agent processing it (configurable under the Playbook).
If you manually respond during that window, the AI Agent will not act on that message, and the conversation stays under your control unless the prospect sends another reply — at which point the AI Agent can step back in based on your configuration.

Q: Can I see usage per AI Agent and per Playbook?
A: Yes. Go to your AI Agent Dashboard from the top-right corner. There, you can review the table on the right-hand side to see usage distribution by agent. You can also view usage distribution by Playbook under the AI Playbooks tab.


Q: Where do I see what the messages AI has sent on my behalf?
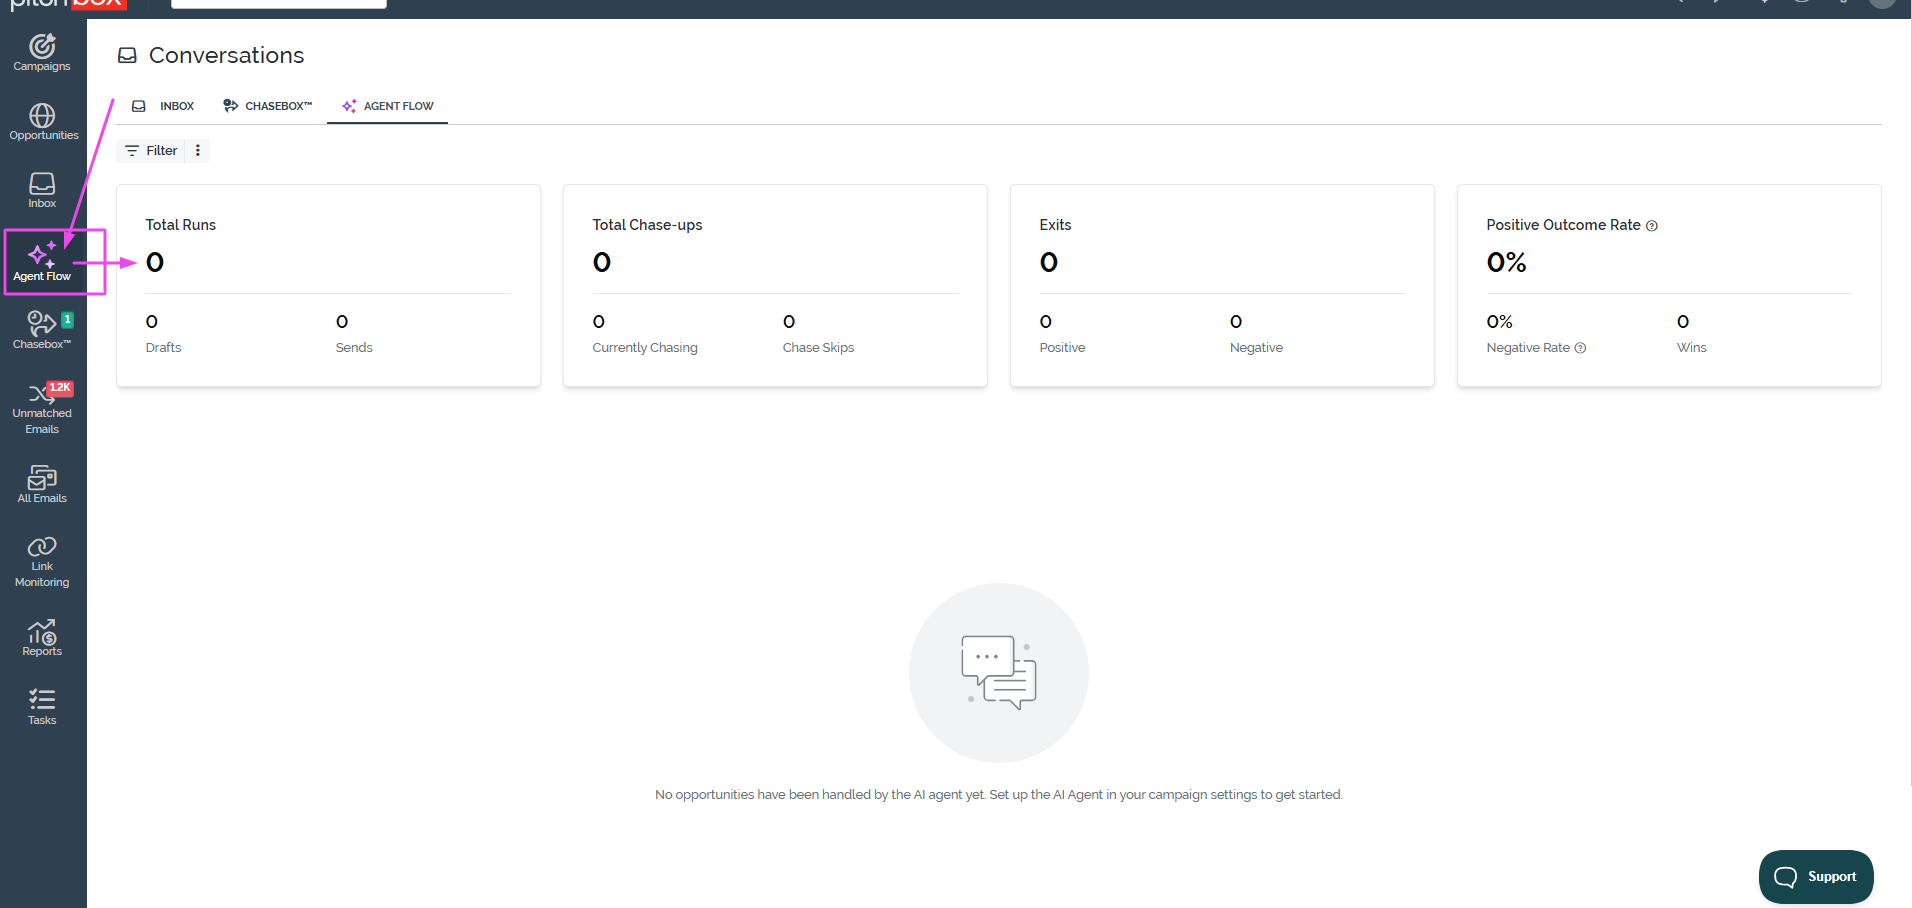
A: Inside your project, the AI Agent Flow Dashboard gives you a clear overview of how your AI Agent is performing, including:
- Runs — the number of times the AI Agent generated and sent a reply
- Chase-Ups — the number of automated follow-up messages sent
- Exits — conversations that reached a defined outcome and were successfully completed
-
Outcomes — a breakdown of conversation results, including positive and negative outcomes
Q: Can multiple AI Agents be assigned to the same project?
A: Yes. This is especially useful when you have different campaign strategies, workflows, or use cases within a project.
Each AI Agent can have its own goals, instructions, playbooks, and exit criteria, allowing it to handle specific types of conversations more effectively.
Q: What happens if I manually reply to a conversation the AI is handling?
A: The AI Reply Agent will stop handling that message once you manually reply.
It only works on conversations that are awaiting a response in the inbox, so after a manual reply, the Agent will not step back in unless the prospect sends a new response.
However, if AI Chase-Up is enabled, the system can still attempt to re-engage the lead if they stop replying, using your configured follow-up rules.
Q: Can I pause an AI Agent?
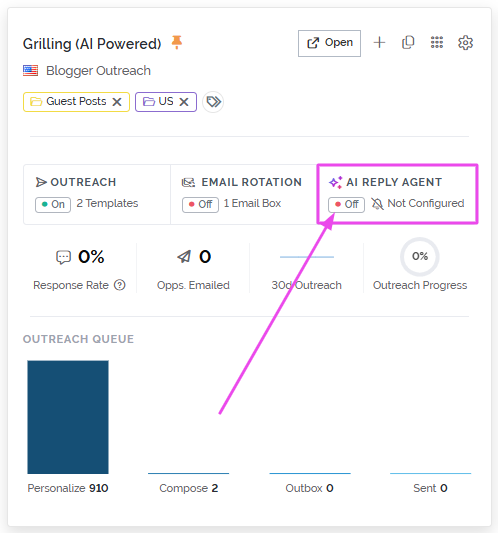
A: Yes, you can enable or disable an AI Agent at any time on a per-campaign basis from the Campaign Card's AI Reply Status setting. The Campaign Card always displays the current status, so it's easy to see at a glance whether the AI Agent is active or disabled.
- Use campaign-level controls when you want to enable or disable the AI Agent across the entire campaign.
-
Use tags and stop rules when you want to control behavior at the individual opportunity level.
3. AI Agent Credits & Usage
Q: What uses an AI Agent Credit?
A: Credits are consumed each time the AI Conversation Agent processes a communication, including messages that are ultimately skipped.
Q: How many AI Agent Credits do I have?
A: The number of AI Agent Credits available to you depends on your team's current plan. To view your available credits, go to Account Settings → Billing Plans. Under Account Usage, you'll find the AI Agent Credits section, which shows your current credit allocation and usage.
Q: What happens if I run out of AI Agent Credits?
A: Once you have used all of your available AI Agent Credits, the AI Conversation Agent will stop processing new communications until additional credits become available or your credit allocation is increased. Any existing Pitchbox automations and standard workflows will continue to function as normal.
Q: Does AI Agent come with all Pitchbox plans?
A: AI Agent availability and the number of included AI Agent Credits depend on your team's current Pitchbox plan. To see whether AI Agent is included in your plan and review your available credits, visit Account Settings → Billing Plans.
💬 Need more help? Email pitchbox@support.com or use the live chat and our team will be happy to help.